

Clearing Up the Fog Around ppi, dpi and Printing Services
/It's time to review the concepts of this subject again. When it comes time to make photos ready for print there remains a lot of misinformation that's causing frustration amongst photographers.
Let's discuss PPI and DPI. Many organizations use the terms interchangeably and while this seems reasonable it is confusing. PPI stands for pixels per inch and is a way to measure final image resolution and can be an accurate albeit mostly unused of measuring sensor receptor density.
DPI, a contraction of dots per inch, is commonly used to measure dot density in printing but is also used as a measure of display resolution by many vendors and thus we see one root of some confusion.
One of the biggest missing areas of knowledge in printing is how to format the file for print. It is not uncommon for modern printers to be able to physically print at very fine dot per inch ratios that seem at odds with what we have heard is needed. Thus it's time to break things down more specifically.

This sample image was provided by Canon Japan. A print from the downloaded full size JPEG looks far more spectacular than this version which is made web ready. Yet, for people who don't print, it looks great the way it is. Both viewers are right, based on their completely different use cases.
Let's start in the camera. For the example, I will use a sample image from a Canon 5D Mark IV. I choose this only because it is a relatively common camera. When we look at cameras, we are sometimes concerned with the megapixel count, which is really the number of unique photo receptors on the sensor. In this example, that is 6720 x 4480 photo receptors, each being about 5.36 micrometers apart. This gives us a pixel area of 28.73 micrometers per photo receptor. What we see when buying is a rating of about 30 megapixels and we figure that's pretty darn good and we'd be right.
We start to think about making a web ready image and start working really hard. The reality is that common web viewing device resolution is stated to be by makers about 72 dots per inch although we really are measuring pixels per inch. Note that some devices will have a higher resolution. Your digital file is WAY better than this and yet for many folks, a web view is the only view ever seen of the image. What a massive waste that is. All the fine gradations and quality are lost on the web or social media viewer. You might as well just shoot with a smartphone.
Serious creatives start to think about making a print and the water gets very muddy. One way to look at this is what we see as good quality print. Most times this is erroneously equated to text where we know that 300 dots per inch looks nice, and 600 dots per inch, looks really special. A mental equation gets created in our editing software that pixels per inch is the same as dots per inch and this is not true. When I open the Image Size dialog in Photoshop, it tells me the maximum native print size at a certain number of pixels per inch for a given file. If I open a file from my 40MP Hasselblad and set 300 pixels per inch, I get a default image size of 24.35 x 18.26 inches. This is what we would consider the default print size at 300 pixels per inch. If 1ppi were the same as 1dpi, then that would be accurately true, and while not the same thing, it is used as a means to assess what the maximum default print size is, as an approximation.
A print house may request an image at a certain PPI. They do this because they want to avoid having to digitally resample the image. Resampling, is a destructive act. For example, if I want a 300ppi image from the Hasselblad file with the intent to produce an 8x10 print, the resampling process must throw pixels away to make that happen given my default deliverable size of 300ppi. If resampling does not do this, reducing the output size to 8 inches on the short side, drives the ppi to 685 pixels per inch which is more than the print house wants. Thus to keep the ppi resolution the same, I must throw pixels away.
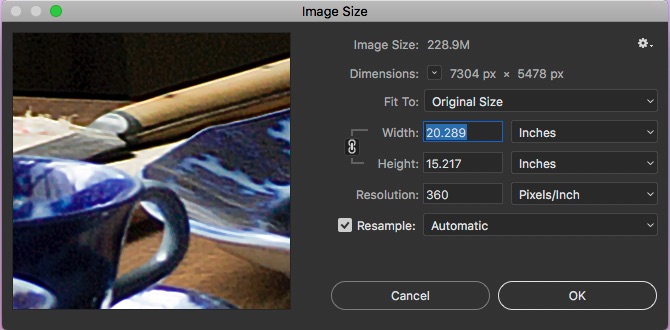
Screen capture of the Photoshop Image Size Dialog. Note that the resolution is measured in PPI which when using the original size yields a native size of 20.289 inches by 15.217 inches. That's the native size, but not a measure of maximum size or minimum for that matter, and that is at a ppi rating of 360ppi
Now let's go the other way. I want the image to print 12 feet or 144 inches wide. Without resampling, the image will be giving me just under 51 pixels per inch. That may actually look just fine, because we as yet have not considered the optimal viewing distance for the image. This is really important so we will come back to it later on. However, for this size of output, I would need to resample the original file and have Photoshop or Perfect Resize create new pixels to fill the gaps in to bring the file internal resolution back to 300ppi. And, unless the photograph is not very good, this can look superb when viewed at a proper viewing distance.
I say this because the iPhone is a popular pocket camera and the 8MP versions have sensors with 3264 x 2448 pixel coverage. That's where the 8Mp comes from and this means ostensibly that the native print size at 300ppi would be just slightly larger than 8x10. Yet, I have made successful 16x20 prints from iPhone images for many customers. How? By using the resampling engine in Perfect Resize to fill in the blanks to make an internal resolution of 300ppi for a 16x20 output.
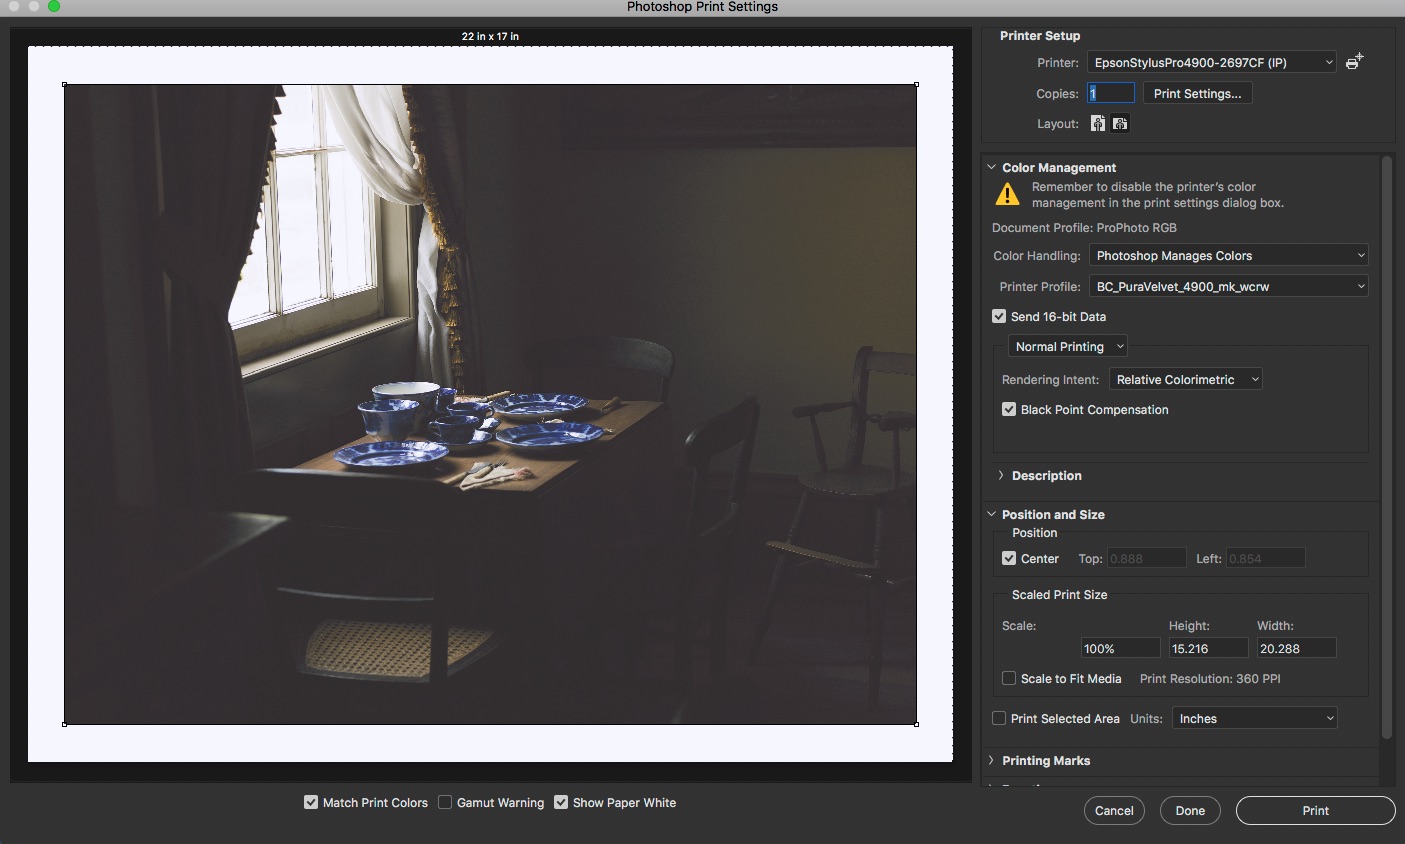
This is the photoshop print settings dialog. Note no specifications of dpI anywhere. Only the output size, in this case the native size from the iamge size dialog and the paper size, in this case 17x22. The printer is not doing any colour correction or adjustment, I am seeing a soft proof for the paper, in this case breathing colour pura velvet
Look closely in Photoshop and Lightroom, or any other well made tool, and you will find no reference in the editor to DPI anywhere. This is because at the digital file level, DPI is completely irrelevant.
At this point, we introduce the print driver to make a physical print. I will come back to making files for submission to a printer because that's also important, but this is a shorter road. Now using Lightroom or Photoshop, I have my print ready file, at a PPI that I am happy with and I invoke the print engine and inevitably I will see choices for print resolution and for the first time I will see DPI setting options. My Epson 4900 printer offers me two options, Superphoto 1440 DPI and Superphoto 2880 DPI. What? Everyone told me that I wanted 300 dpi! I'm completely confused.
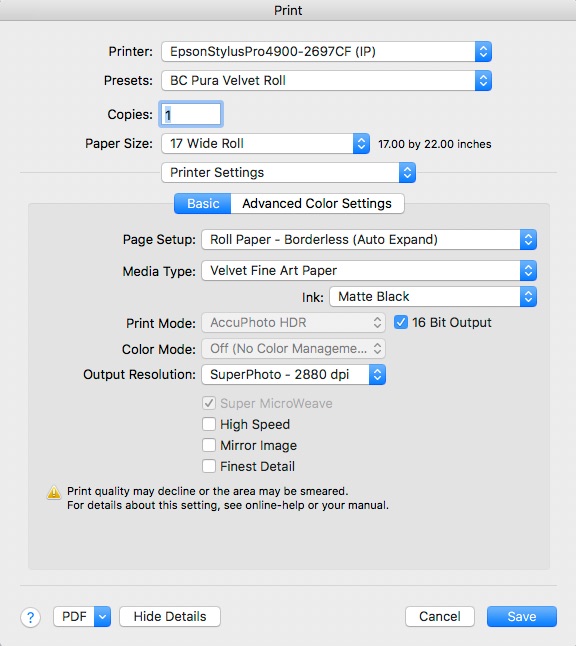
these are the print driver settings and for the first time we see a dpi number and it is 2880dpi because dpi only matters on the print itself. i'm printing on a roll of breathing color pura velvet and have created a preset for it with all the right settings to deliver superb output.
Actually, I'm not confused at all. 300 dpi is fine for laser printer text on copy paper. I am printing a photograph on fine art photographic paper. 300 dpi has no place here. It is at this point, I need to know the optimal PPI setting for the image to feed the printer as well as the desired output size. The printer takes the image and does some significant work. If I choose Superphoto 2880, that means that the printer will physically deliver 2880 dots per inch, each dot made up of one or more colours of ink. The finer the dpi resolution, the more ink is used. I have a great deal of difficulty seeing the difference on good paper between 1440 and 2880, but it is there.
Which in a highly roundabout way gets us to proper viewing distances. How do you spot the photographer at a photo exhibit? This will be the person climbing inside the safety ropes to drive their eyeball against the print, regardless of size. This will also be the person whining about noise or when they are really dumb, grain. The word to describe this person is IDIOT. Prints are made to suit a viewing distance. A smaller print must have a higher DPI resolution because it is a compact object, that will be viewed closer. A billboard looks good from the highway, but the actual printing is between 12 and 15 dpi. The viewing distance makes this look acceptable. The decision about dots per inch is made by the printer and has nothing to do with the photographer.

using the proofing function in photoshop to make print specific edits on a copy of the original file to adjust for the reflectance, brightness and texture of the final print. Here I have begun creating a custom proof condition for this particular paper. Obviously, i have not yet applied the needed edits to bring the proof to the poiint that i want it to be. for some, this is really tedious. for me, it's integral to my image making process.
Now let's circle back to making a printer ready file, and by this I mean a file that you will be sending to an external printing service, rather than printing at home on your photographic printer. There are a few things that you want to know from your printing service. A printer ready file has already been edited completely and may be a soft proof virtual copy that has had additional tweaking by showing you a paper and ink simulation so you can make adjustments for the reflectance and surface of the preferred paper. This requires an ICC profile from the printing service as you will see below. I should not need to mention this, but if your display is not calibrated, stop all thoughts of high quality prints until you have calibrated your display. If you need more information on this, check my website for articles specifically on calibration. Images edited on non-calibrated displays have a high propensity to end up too dark and looking like dog poop. Display calibration is integral to successful photo editing. If you don't do it, don't expect much from any prints, ever. If all you do is post images to Facebook or Instagram, you may not care, but I have yet to meet a serious creative artist who does not calibrate the display on an ongoing basis.
First, you should ask what file format they want. Most anyone can use JPEGs, but let's not forget that JPEG is a destructively compressed format. Higher end printing services may request TIFF format. This is a much superior format, but generates very large files that can typically not be emailed. Lightroom cannot export a print ready file in any format other than JPEG. I can print up to 17 inches wide on the Epson 4900 and when I need to make files for larger final prints, I use Photoshop to make the file.
Once you know the file format, you need to prepare the file for the desired output size. This means that you need to crop the image to fit the proper aspect ratio. Never leave this to the printing service. Then you must adjust the image size to the desired print size. How this is done will depend on the software you use.
Next, you must ask the service what PPI level that they want the file to be. The higher the PPI setting, the larger that the finished file will be. Many better printing services will request something between 240ppi and 360ppi. Make sure this is set at the same time as the image size is adjusted. Photoshop makes it very clear how this works, but Lightroom conceals some of the information in order to make the user interface simpler. The good news is that either program will do resampling as needed to fit all the parameters. You want this to happen. This is one reason why serious imagemakers spend the money on serious software. Most of the cheap stuff is not quality print capable. Capture One is also capable of doing this resampling.
Next, in order to make the file ready for the printing service, you must have and embed the ICC profile for the service's printer in the file. If a service tells you that they do not have ICC profiles, this is a good time to get nervous because you are not able to get a good sense of colour match between the edit space and what the print will look like. Sometimes a printing service will say they do not use ICC profiles and just to set the ICC option to sRGB. This works, but is definitely not optimal because it does not take into account the paper surface, the presence of OBAs and the paper's natural brightness. This should be a sign that your printing service is not truly high end, and you should expect inconsistency in output.
You should also ask about the desired colour space, although it matters not for JPEGs because they are 8 bit files and are thus only capable of dealing with the sRGB space. TIFF files can be stored in a variety of colour space options and the printing service must tell you which one that they want. It's also common to apply a for-print sharpening option. Adobe products offer you three levels of for-print sharpening and two paper surface types, gloss and matte. If you are not sure what to do and have already sharpened as part of your edit workflow, choose standard and whichever surface option most closely matches the surface of the paper you are getting. Again, a professional printing service will give you guidance.
Once you get all these settings in place, you are ready to export or save your printer ready file for submission to the printing service. If you view this file on your computer display, it will likely look wrong and that's because it has been made for a paper surface with no backlighting, no 1000:1 contrast ratio and none of the other things that characterize a display. A print export and a display export are two completely different things. If someone tells you different, I am sorry to say that that person does not know of what they speak. Submit your finished file via whatever upload mechanism that the print service provides.

A screenshot from the ROES client for MPIX Pro
Some pro printing services such as White House, MPIX PRO and BayPhoto, among others, offer a very specific submission system called ROES. ROES is a contraction of Remote Order Entry System, and is software that you run on your computer to prepare your image for printing in a central tool, including cropping, paper selection, and print size amongst other things. ROES takes a bit of time to learn, as different labs use different ROES clients, but it pulls all the pieces into one place. A lab with a ROES system may be telling you that they are serious, and can do volume work. The other benefit of using a ROES system is that the printing service will not be doing any additional colour correction. This is a big deal. You worked hard to get the image looking the way that you want it, and you do not want the service making changes to the colours. If your service does not use a ROES client, be sure that there is an option on your order to confirm that you do not want the printing service to colour correct your image.
A major benefit of using a professional printing service is that the service may also offer mounting, finishing and framing services. Yes you will pay more than doing it yourself, but if some gets farked up in the process, it's on them not you. If you are selling the prints, you can still mark up the cost of these additional services. Alternatively, you can use a local professional art store to handle the mounting, matting and framing for you unless you are bound and determined to do it all yourself. This means more gear for you to handle and more skills to learn. I both buy and make my own frames and matts. You may be more interested in not doing all that stuff and the charge for a pro to do it, can be very reasonable, all things considered.
Regular readers are familiar with my refrain that a photograph is not finished until it is printed. A print is alive, it is tactile and it gets seen, instead of dying alone and in the dark on some hard drive somewhere. If you take your photography seriously, you must be printing. If you aren't you are missing a huge element of joy. I hope that this article helps clear some of the fog about printing particularly that revolving around ppi and dpi, as well as some other common misunderstandings.
If you shop with B&H Photo Video, please consider doing so through the link on thephotovideoguy.ca as this helps support my efforts and has no negative impact whatsoever on your shopping experience. If you find the podcast or articles of value, consider clicking the Donation tab in the sidebar of the website and buy me a coffee. Your donation goes to help me keep things going. Email your questions on any photo or video topic and I will try to respond within a day.
I'm Ross Chevalier, thanks for reading, and until next time, peace.


