

Q & A : How do I make a High Key portrait?
/To ask a question simply send an email to ross@thephotovideoguy.ca Reader Jens sent in the following question. "I have seen some portraits called high key on the web. The picture looks very light and the background is completely washed out, but there is still lots of detail. How do I do this? I have a Nikon D7100, a 105mm micro and a SB-910 flash. I think I need a background and more flashes but I am not sure. Is this an expensive method? Can you help?"
Thanks for writing in Jens and yes I can help. High key as a style has come in and out of favour over a long time. I like the look myself and it's pretty easy to do. You will need at least one, probably two, more flashes but you don't have to spend a ton of money on the other flashes since purely manual ones will do.
It will help if you have a flash meter but it isn't completely necessary. I will tell you how to do it without a flash meter using all the flashes in manual mode for simplicity. You will definitely need a white background, preferably a paper roll to reduce wrinkle shadows, a background stand of some kind and a diffuser of some sort for your SB-910. Fortunately you have a D7100 that supports Nikon's Creative Lighting System so this gets easier to get your flash off camera.
Let's work back to front.
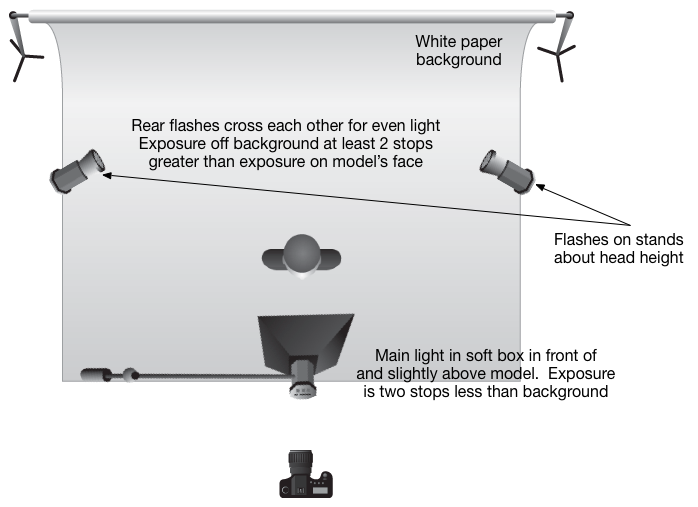
Start by putting your paper roll on the background stands and rolling it out to make a smooth backdrop right to the floor and forward on the floor a bit. You want white on the ground for more reflection.
Put a simple manual flash head on either side of the background and angle them so the beams "cross" each other to make even light coverage on the white paper. Set the flashes at full power to start and make sure that their slave mode is enabled. This will cause them to fire when they detect your main flash going off.
Put a mark a few feet in front of the flashes where your model with stand or sit.
Put your SB-910 in manual mode at say ¼ power and put it on a stand and use a soft box. If you are doing only head shots, a 20" x 20" soft box will do the job, go bigger for more coverage. A good place to start is the Lastolite Ezybox Hotshoe. I recommend the Joe McNally version for high key because the box is lined with white instead of silver, producing a softer light. The box comes with the bracket for your flash, you will need a light stand and tilter bracket as well. If you already have a flash diffusion system, you can get by with what you have.
Position the soft box so it is in front of the model and aiming down towards the model. This produces a sort of beauty dish style light but one that is softer.
Set your D7100 to Commander mode so the popup unit will trip the SB-910 but not contribute to the light. You might need to fiddle with the sensor orientation on the SB-910 to get it to read the popup. If this is a hassle or you are shooting right under the soft box, you will need a set of radio triggers. Get the Cactus V5 system and you are good to go. They don't do TTL but you will be just fine without it, and it doesn't really work for high key anyways.
What you want is the light on the background to be AT LEAST two stops brighter than the light on your model. So if your test exposure says that you get a very nice exposure of the model at 1/125 and f/5.6, you want the exposure on the background that gives completely white response to be at least 1/125 at f/11. This is why you turn the back flashes up high and the front one down a bit, to help get this ratio happening. You aren't using TTL because your camera would be trying to turn down the background making the model silhouette out. This is where manual is best and actually easiest.
I've attached a simple diagram so you can see what I mean. Keep your main light close to the subject so it's really soft. You may need to dial down the power on the SB-910 to get the right ratio, just keep adjusting until you get the initial exposure on the face right and then manipulate the power on the two rear flashes so they are at least two stops brighter. This will give you the washed out background, some nice spill around the model's periphery and that high key look.
Now start experimenting with some over exposure of the main exposure. If the "correct" exposure is 1/125 at f/5.6, shoot at f/5, f/4.5 and f/4 to see which you like best. You'll be overexposing the background as well but there's a lot of subjectivity that goes into what the "right" exposure from your main light is.
Now, if you have a flash meter, it gets easier because you just meter the light coming off the background when the rear flashes fire and then set the output level on the main flash to be at least two stops less. What does this get you? It saves you time getting to your starting point.
Ideal Gear Scenario
- 3 Flash Heads of similar output, manual mode, output power control, slave function
- 2 Light Stands with hotshoe flash mounts
- 1 Light Stand, Boom optional
- 1 Softbox, flash bracket and tilter head
- 1 Background Stand Kit
- 1 Wide Roll White Background Paper
- 1 Radio Trigger Set from Camera to Main Flash
- 1 Flash Meter
Note that the gear listed is going to be useful for a lot more than just high key portraits and will be valuable for all kinds of different shooting scenarios. I've recently discovered the Lastolite Hilite, a dedicated popup background specifically for high key. It's a 6' x 7' pop up system with an outer white diffusion panel and an inner white reflector stitched together by separators about 16" wide. It comes with four 16" rods to hold the front and back sections apart and has zippers on all four sides that open to allow you to get the front of the flash heads inside the enclosure. It's not inexpensive but it is readily portable and collapses into a disk about three feet in diameter. I've just ordered one in and will provide a review in the future.
Thanks for the question, I hope that this has been useful.


