iTR AF and Auto ISO for Hockey with the Canon 7D Mark II
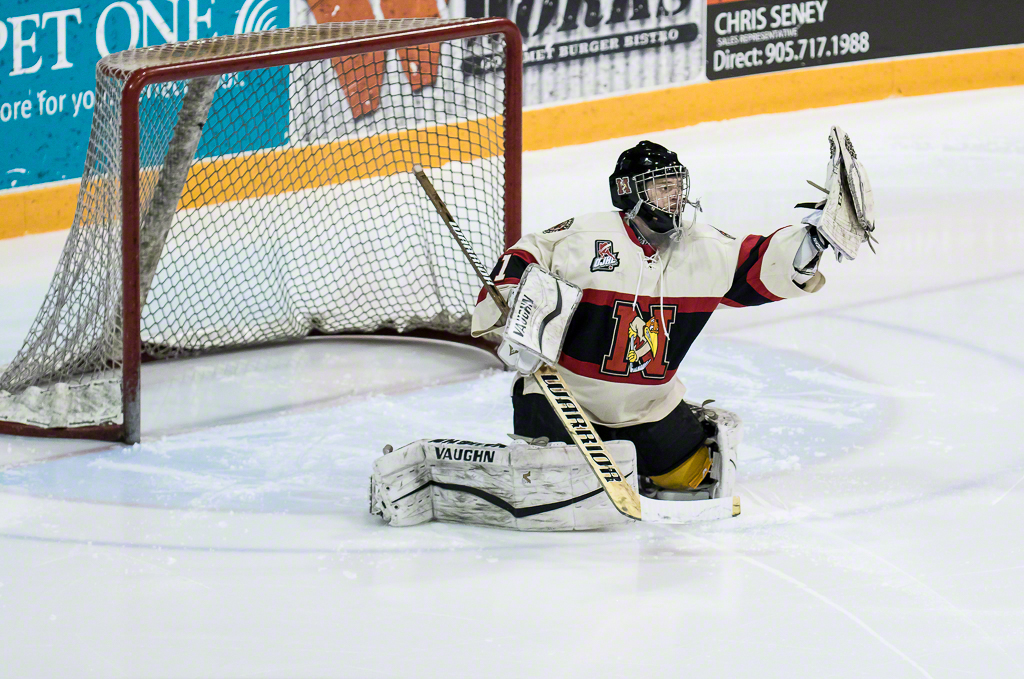
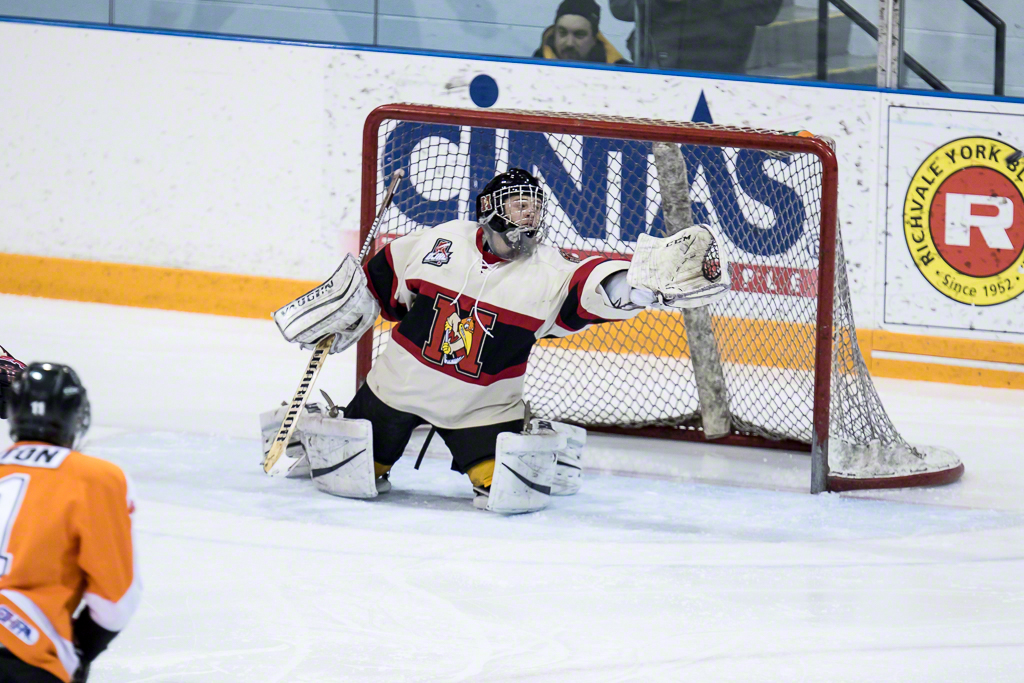
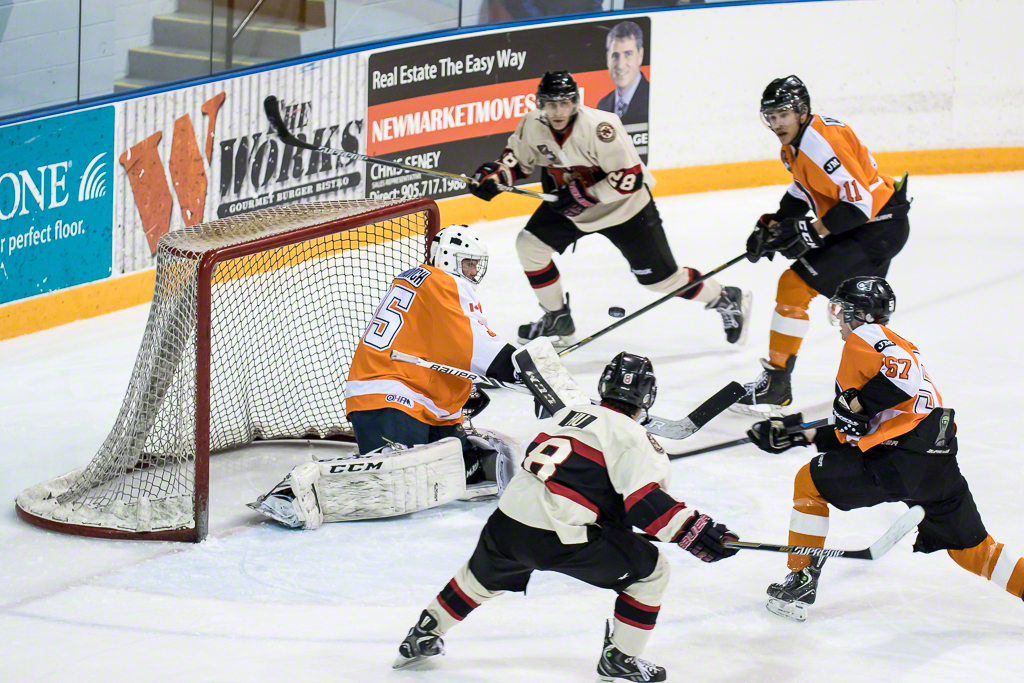
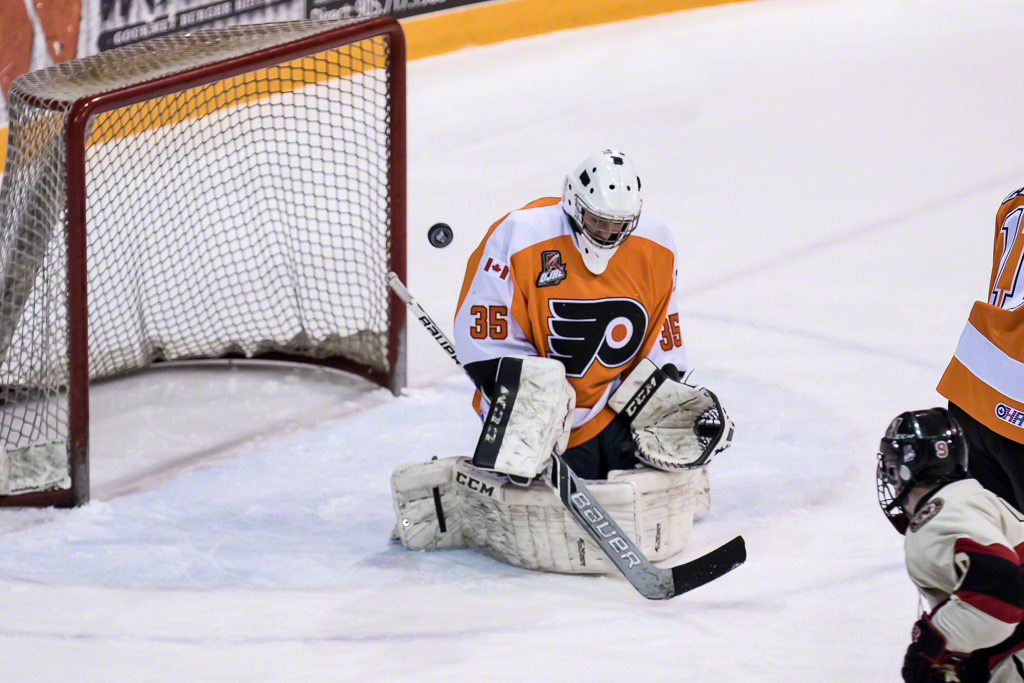
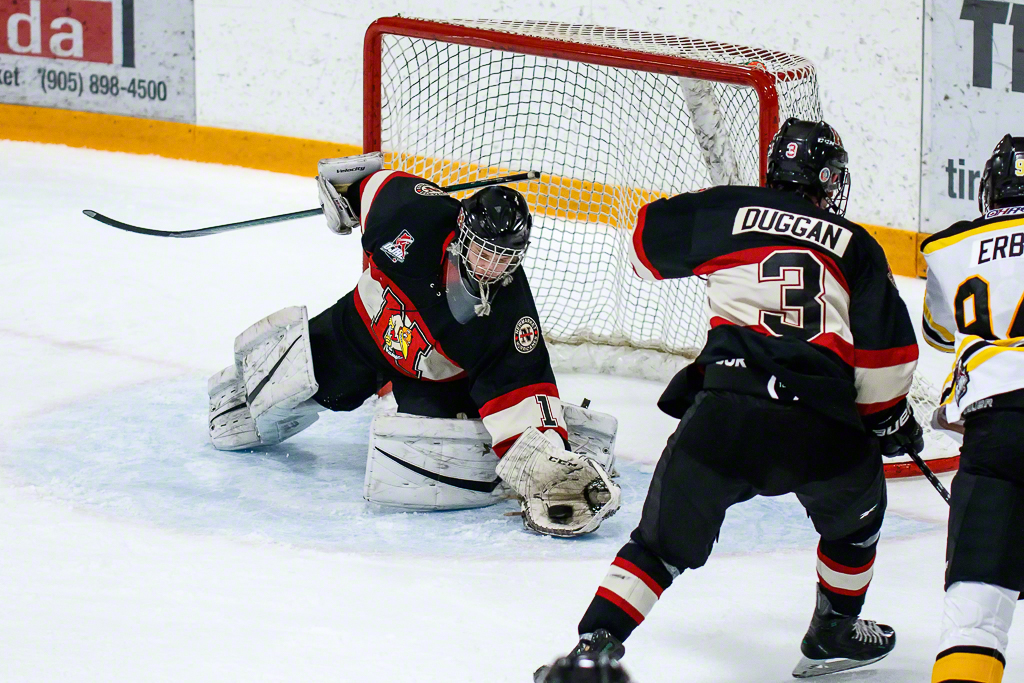
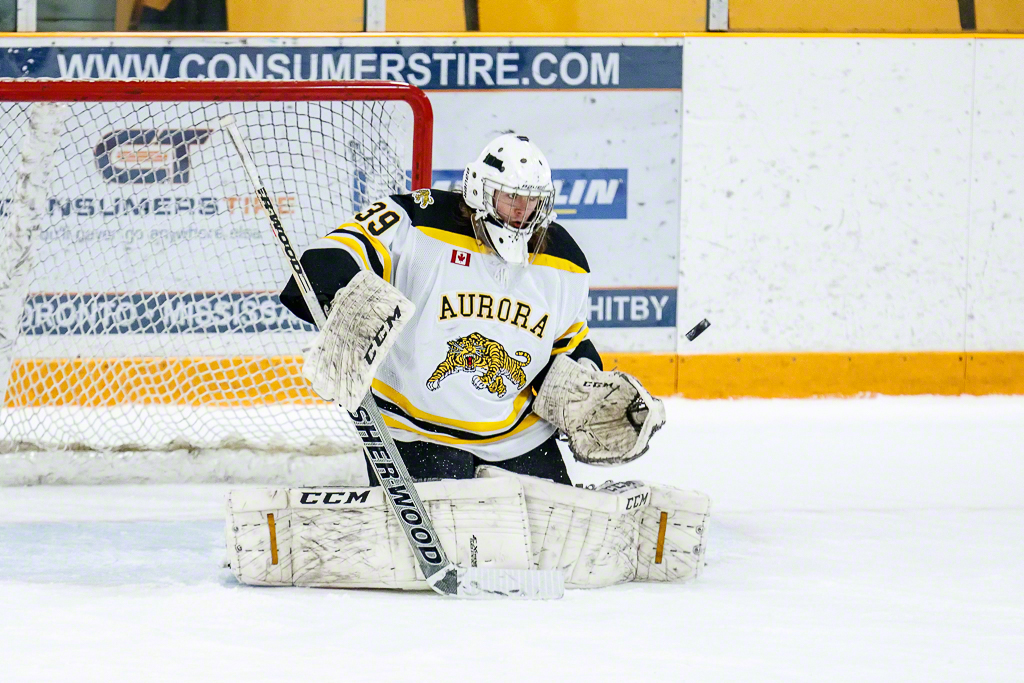
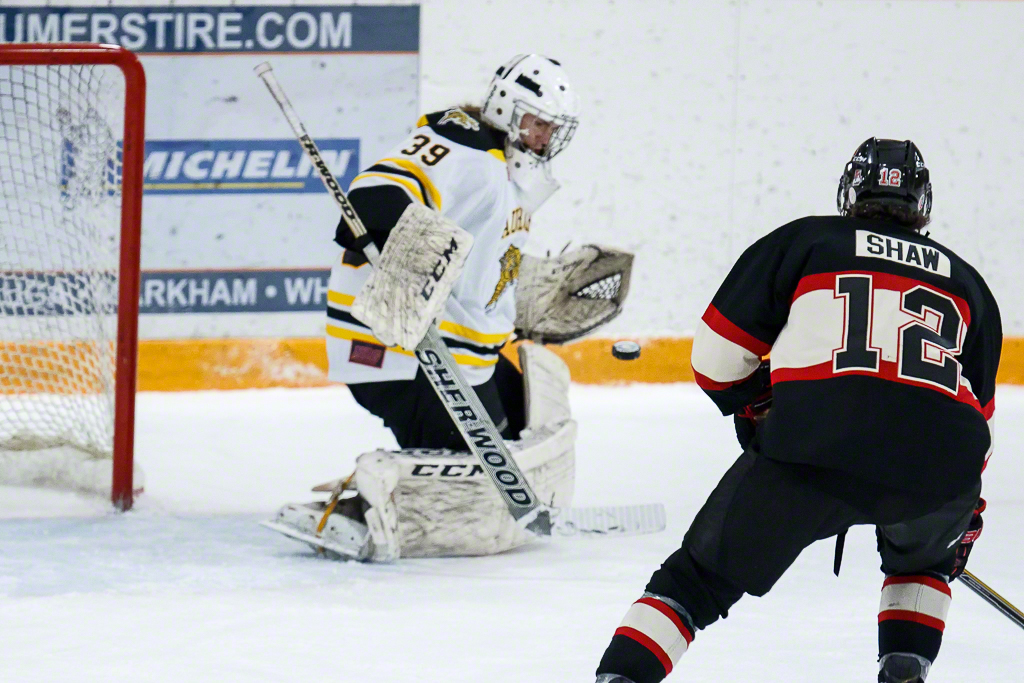
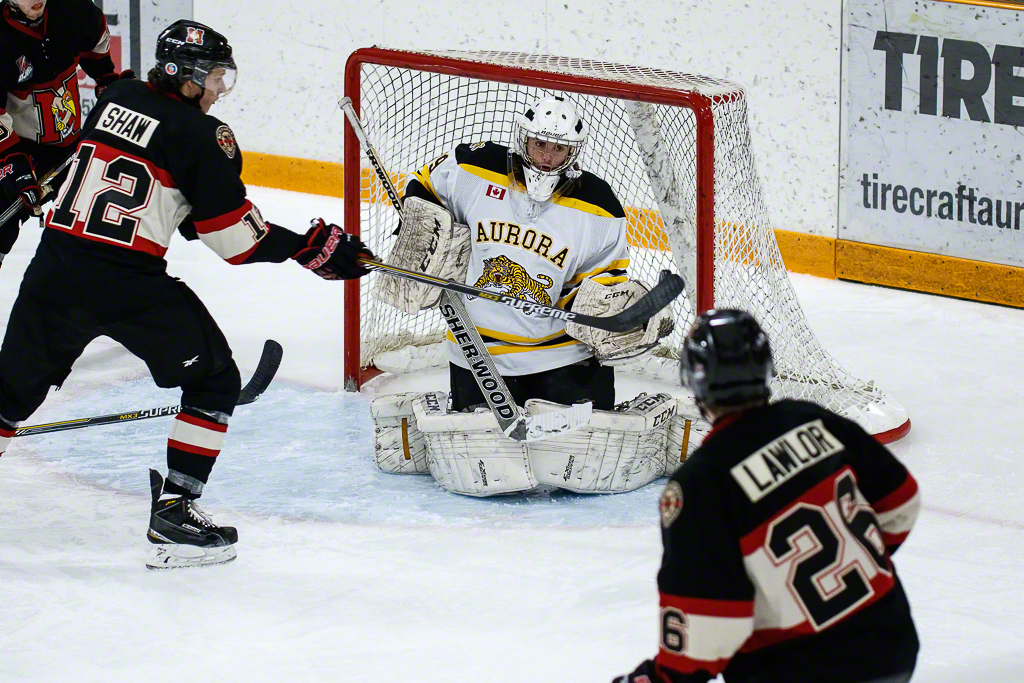
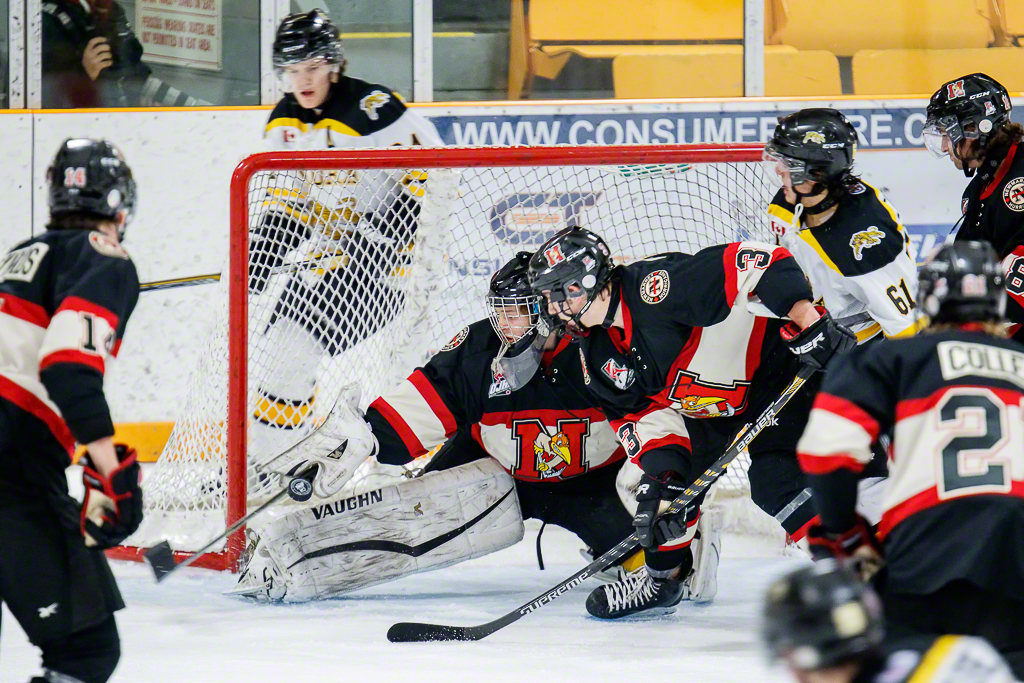
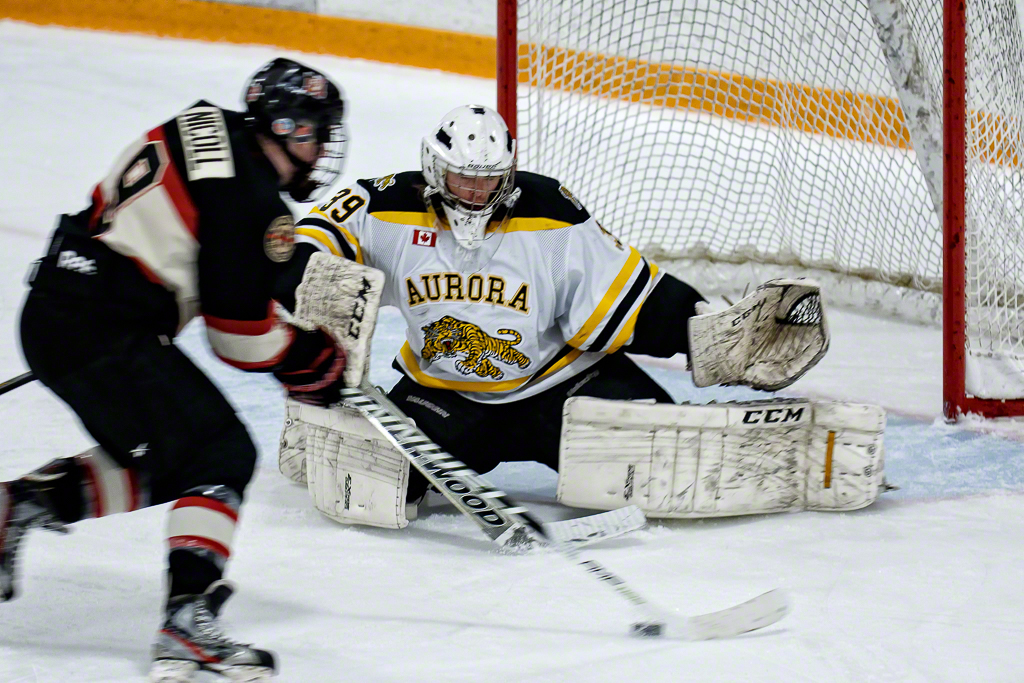
Another game, another set of experiments with the 7D Mark II.  This time it was the same core kit, 7D Mark II, Sigma 120-300/2.8 and RRS monopod but with very different settings.  I wanted to give Canon's full 65 point tracking autofocus a go and also see what would happen if I let the camera manage the ISO where I set a shutter speed floor and left the lens at f:/2.8.  The results might surprise you.I have four Canon bodies.  An original 7D hacked for video, a 1D Mark IV, a 1Dx and the new 7D Mark II.  I bought the 7Dm2 specifically for sports and wildlife and given that it's winter here in the Great White North, hockey is where the camera is getting its workout. Friday night I went to the Aurora Community Centre aka the ACC (folks in the GTA will get the inside joke) to watch the battle of Yonge Street where the Tigers hosted their local nemesis the Newmarket Hurricanes.  Kim came with and the Canes got a brand new cheering section as a result.

I was quite nervous about trusting AF point selection to the camera.  I had tried this once before and didn't have spectacular results but never on this camera.  So I set the camera to auto select but made the choice to have it start with the centre AF point, the one I usually use all the time.  The first thing you notice is that as soon as you activate the AF, in my case by back button as I have deactivated the AF initiation at the shutter release, you get this jumping bunch of AF points.

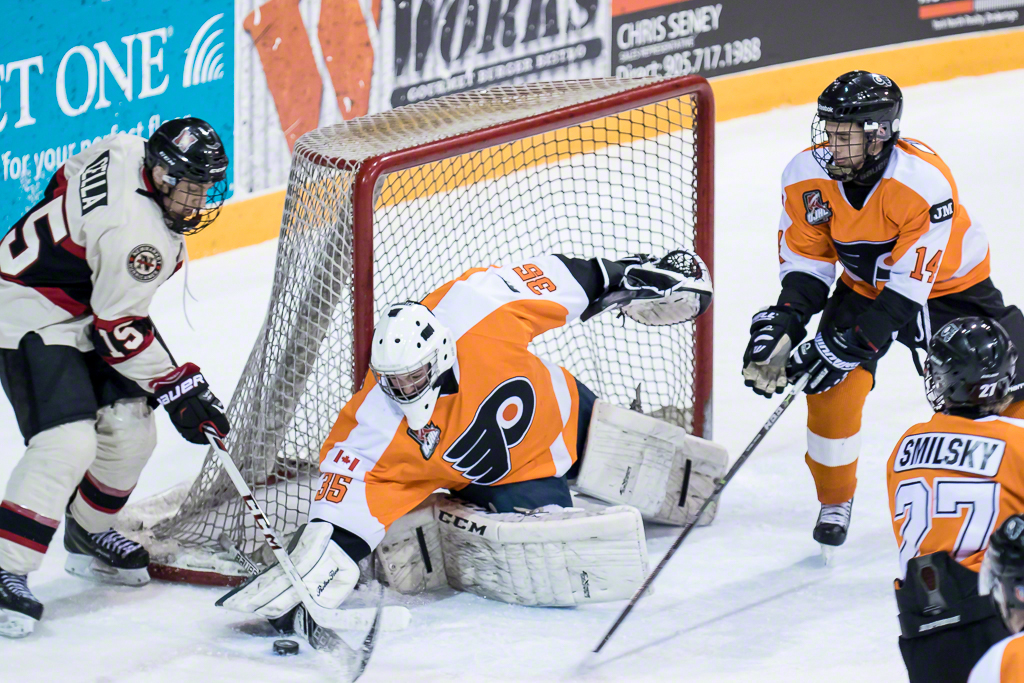
As you recompose, they do a decent job of holding focus as the subject moves or you make a viewfinder recomposition.  My usual mode in AI-Servo is to lock focus on the subject and hold the button down and track manually.  The automatic way using iTR AF is certainly quick and less eyestrain than the manual method.  I did find however that shooting in Case 4, if another player crossed in front of the subject I was locked on to, there was at least a 50% chance that the iTR AF would grab onto and follow the new subject.  I considered switching to Case 2 but only after thinking about things after the fact, so that's a future experiment.

I also discovered that the jumping and flickering AF points are a real distraction.  I did not have them set to glow red as is an option and I'm glad I did not because that would have made me nuts.   It seemed the longer I held the AF button down the greater the probability that the iTR AF would wander off.  In high speed play action, I had to learn to release the AF button and relock it quickly if I wanted to hold focus and before I learned this, I missed a number of what would have been great glove saves because they were out of focus.  I don't think I would have had the miss rate if I had been in my usual focus mode.

So I conclude that iTR AF works decently well, but my initial experience is it does not work well enough to depend upon in frantic hockey action in front of the net.  A player on breakaway is tracked very well and so long as nothing distracts the automatic tracking it's pretty good.  I will try the same settings but with iTR AF turned off next time.

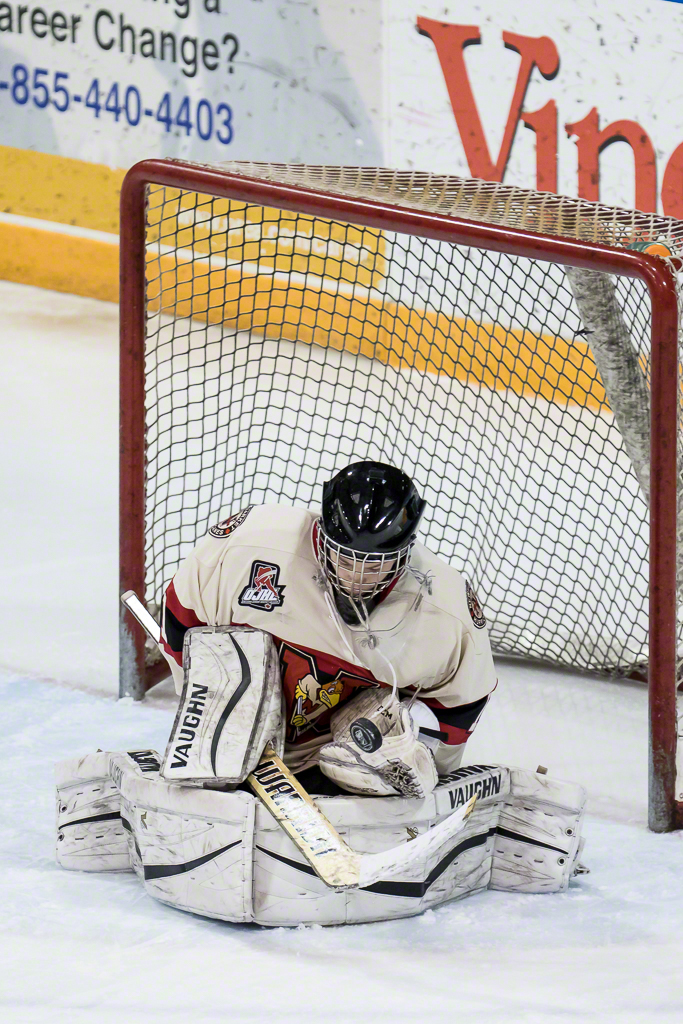
Auto ISO is a feature I rarely use.  I am an old film photographer and still equate ISO with noise so I tend to pull the ISO as low as I possiby can, but sometimes doing so results in some motion blur, so I thought I would give it a shot.  Canon's Auto ISO lets you set a range of potential ISOs for Auto to use, I set mine for the range between 100 and 6400.  I also set a floor shutter speed of 1/500 for periods 1 and 3 and 1/250 for the second period, just to see what would happen.

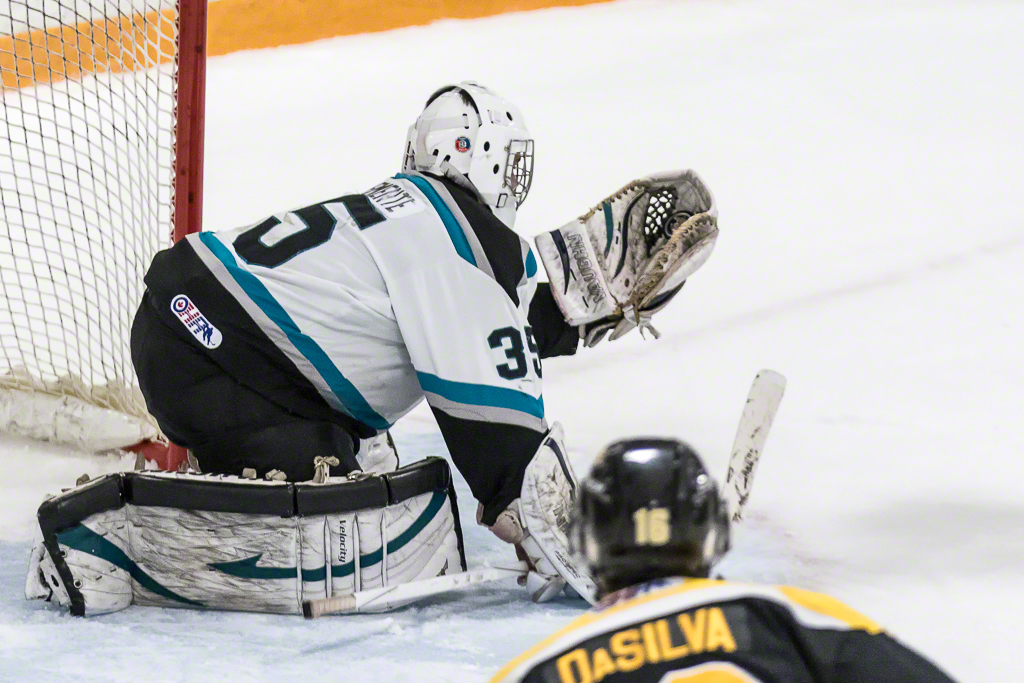
The Aurora Community Centre is fine for viewing and even for video, but for still photography, the lighting leaves a lot to be desired.  The lighting above the north end net is particularly crappy with nearly 1.5 stop drop off.   On a number of occasions I found that the ISO had maxed out and the shutter speed had dropped below the floor in order to get the shot.  It's interesting to note that the defaults will override the lowest shutter speed if the set ISO range tops out.  On the other end of the spectrum though, instead of living at ISO 2500 as I usually have to do at the ACC, in some situations I found that the ISO dropped to ISO 1000 near the south net giving me nice high shutter speeds and crisp images.  There's a benefit to letting the camera handle the ISO but you really need to be cognizant of the range you will allow.  What I did notice is that where in the past I would top out the ISO at 3200 and be a bit grumpy about the noise, the Auto ISO regularly pushed well beyond that and my favourite shot of the night (top of post) is at ISO 4000 and it looks very good.  What I learned is that the noise difference between ISO 3200 and ISO 5000 is marginal so if you have to push it, you can push it relatively hard, and so long as you don't need to crop in at all, and I tend to crop everything a bit, even ISO 6400 is quite acceptable.  I come away from this experience liking the camera more than I had been.

This is the first time that I can recall defaulting writing to the SD card instead of the CF card and I noticed an incongruity in the file naming.  When I use the CF card to save images are saved in sequence when shooting in burst mode.  I had the camera set to low speed burst configured for 6fps for all the games.  This game I was saving to the SD card, also a Sandisk Extreme Pro, this one rated at 90MB/s.  Interestingly the images from bursts are saved in reverse order where the last image is the first saved and has the lower file number. I have never seen this before and it is freaking weird when you are going through your images in the library and the play action appears to be going in reverse.  I'd be curious to learn if anyone else has seen this behaviour.  No images were dropped, nothing was lost, they are just saved in reverse order and only when in burst mode.  I counted the images in each sequence when this happened and the max number of images was five, so no where near the max buffer load of 31 RAW images when using UDMA cards.

Here's a gallery of images from the game with some EXIF info shared so you get a sense of what the camera decisions were.

So the 7D Mark II stays in the shooting stable and as proof of that I have made even more firmware hacks to the original 7D so the likelihood of it coming out of video mode in the future is near zero.  The 7D Mark II with that Sigma 120-300/2.8 APO IS is now the go-to hockey kit.

The other comment I would add is that while my Really Right Stuff monopod does not go as high as the Gitzo it replaced, the leg locks also stay locked instead of loosening off under pressure.   I am also using the Really Right Stuff MH-02 LR monopod head.  Using a monopod without a proper head is way more work than it needs to be.  This head tilts fore and aft and also rotates the mount through 90 degrees so you either mount the camera or a lens plate and have the tilt work in the proper direction.

Round Two : The Canon 7D Mark II for Hockey

Second full game test is now done and I am happier overall. Here's the basic setup.

Canon 7D Mark II, Sigma 120-300/2.8 APO IS, ISO 2000, f:/2.8, Aperture Priority, Flicker Control Enabled, EV +1 ⅔, Stabilization enabled option2, all shots off a monopod.  Focal length anywhere between 120mm and 300mm.

Different arena (Ray Twinney Centre in Newmarket) and different teams, Newmarket Hurricanes vs Orangeville Flyers.  The two teams were very closely matched and the guys played hard all night making for a wonderful game.

Let's see what I learned this time;Autofocus

Set to Case 4, what I usually do for hockey, single centre point spot.  Back button focus only, focus at shutter button disabled.  I found the AF more responsive this time, partly because the lighting was brighter and more contrasty and partly because of disabling the shutter button driving focus as well as the back button.  I still don't like using any more points than 1 for sports although I know the camera is quite capable.

Anti-Flicker

I said I planned to shoot this game with the flicker control disabled but my first two shots were giving me the flicker warning in the viewfinder and it impressed me that it could tell so I turned it on.  Documentation says you may encounter degraded response in shutter release but I did not find this.

Going Longer

I shot the first game with the 70-200/2.8 L IS II and had to crop in too much.  300mm on the 7D is a bit long and I was certainly rolling the zoom a lot more with the big Sigma and its weight requires a monopod unless you are very strong and don;'t fatigue.  That said, I am much happier and I was into the flow of the zoom by the second period.  As this was my second game, I have beaten a lot of the rust off my technique for shooting hockey that showed up in the first game.  Keep rate was much higher.

ISO Choice

I shot the first game at ISO 3200 and I found the contrast loss and noise to be on the edge, especially when cropping.  I forced myself to shoot at a lower ISO for this entire game, in this case ISO 2000 and the noise is much better for the shift of only ⅔ of a stop.  I had to crop less as well so the noise is less apparent.  Next time I am going to raise it again for the light at the Twinney Centre to first period 2500, second period 3200 and third period higher still.  Light with some contrastiness to it benefits the sensor for certain, but I need higher shutter speeds.  I lost too many otherwise good shots due to motion blur and need higher shutter speeds to really get sharpness.

Burst Mode

I had changed the low speed burst from 3fps to 5fps and will bump it again to 6fps.  Hi speed at 10fps is a waste for the speed of these games and 5fps is just on the edge of too slow for the fast action the teams displayed at the game.

Importing and Culling

I verified that my experience last week with corrupted downloads was the Lexar Professional USB 3.0 Dual Slot card reader.  A different reader (Delkin) worked fine with the Sandisk Extreme 120mb/s cards I was using.  I did an ingest with Photo Mechanic to enable the core image culling.  Very fast, nice rendition, and very very quick from image to image.  I also then imported to Lightroom 5.7 from the disk location that Photo Mechanic ingested to.  It went quick enough but moving from image to image is still much slower and there is waiting for each RAW to render fully if you use Lightroom for culling.  With over 700 images, the performance difference means time back in your life.  I know that Photo Mechanic does a lot more than just speedy sorts and IPTC info updates, but I don't get the full benefit because I haven't spent enough time with it.  Their support is excellent and LIVE people talk to you.  If you have a need to import and cull large amounts of images, you should get the free trial for Photo Mechanic and give it a shot.  I don't get any compensation from them so there is no incentive for me to recommend this beyond that it is great.

As mentioned, I imported the ingested and culled images to Lightroom as it is my primary library for images.  It works fine and shows the 7D Mark II CR2 images without issue.  I did a couple of other experiments as well.

RAW Conversion

I was a bit underwhelmed with the image quality from the first game and thought it might be related to the Adobe RAW Converter.  Conversion is often reverse engineering because the camera manufacturers are not inclined to release their RAW formulas and folks like Adobe have to hack their way in to some extent.  This week, DxO released an update to DXO Optics 10 that adds support for the 7D Mark II.  They do their own RAW converter independently of Adobe and Apple.  I tried all three.  Truth to tell I cannot tell the difference from one to the other.

The Sensor

The review by DxOMark of the 7D Mark II got a lot of attention because it called out the new sensor as being a moderate improvement over the original 7D, competitive in its field and having too much noise at low ISO but competitive at higher ISO.  The thing about these tests is that while they are very accurate and extremely scientific, I have to wonder how applicable they are in real life.  I also know enough that the lens in use will have an impact.  Nonetheless because my buddy Bryan asked me, I ran the database results for the 7D Mark II and compared it against other cameras and most of the time, the DxO scores rank it lower than the competitors.  One thing I did notice is that the number of lenses tested is not documented for the 7D Mark II but many lenses are specifically listed for the others.

In my little world, what works for me is whether or not I am happy with the image quality.  For my own work and with direct comparison, the 7D Mark II is an improvement over the original 7D, particularly in the area of higher ISO.  I would say it is better by about 1.5 stops.  It is no Prince of Darkness like the 1Dx, and not even as good as my aged but reliable 1D Mark IV.  The challenge is the lack of consistent points of comparison.  I selected the camera for the reach with long lenses, the frame rate for sports and the weight or lack thereof and expected (and delivered) superior low light performance over the 7D.  Does the D7100 get a better rating? Yes it does, so does the D3300 and the Sony A77 beats them all.

My question to anyone who gets caught up in spec wars is whether you can see a difference.  If you think you can, then let that drive your choices.  DxO rates the 7D Mark II as equivalent to the long discontinued Nikon D300s, which was in its day a leader.   Ok.  I am happy, albeit not overjoyed, with the sensor performance in the 7D Mark II.  But I will wait for a couple of firmware revisions as Canon is notorious for using firmware to throttle the performance of some of their products, with no customer logical reason for doing so.  Time will tell.

Handling

I may have mentioned that I put the battery grip on my 7D Mark II.  I am so used to having a place for my third and fourth fingers to grip, I find it hard to shoot a DSLR without a grip.  I do need to get a proper RRS L-Plate for the 7D Mark II for tripod mounting but for the game I used the plate on the foot of the Sigma to attach to my RRS Monopod head.  While the camera itself is well balanced, you can feel the strain created by long heavy glass so proper support is important.

There is a new rocker switch to allow you to rapidly shift between focus points.  I will cut it some slack because a) it's new and b) I rarely if ever change focus points when handshooting but so far it's in the way.

After over 1.500 shots, I still don't like what Canon has done with the Info displays in playback mode.  There is too much JPEG related crapola and I yearn for a cleaner interface.

Next Steps

I think that my hockey kit will be the 7D Mark II with the Sigma 120-300/2.8  They work well together and if I push the ISO a bit higher in the Twinney Centre and work on being able to crop tighter in camera, I am confident that things will go the way I want.  Polo season is months away here in the Great White North, so my next test will be a complete changeup.  I will be doing a side by side comparison of the 7D with Magic Lantern firmware against the 7D Mark II in a video recording session.

Here are the sample images from the Hurricanes - Flyers game

Real World Test : Canon 7D Mark II in crappy arena light

For this story to make sense, I must be clear on something.  I bought the 7D Mark II for two specific use cases, both tending towards longer lenses and both tending towards a preponderance of crappy light.  So you understand, the use cases for the camera are wildlife and sports.  Last night, I along with my good friend Will du Plessis, trundled off to the Aurora Community Centre to photography an OJHL match between the Aurora Tigers and Lindsay Muskies.  We both were shooting the 7D Mark II with the Canon 70-200/2.8L IS II.  To learn how the 7D runs at higher ISOs in horrible lighting, read on...Don't get me wrong.  I love shooting OJHL hockey.  The players really want to be there, work hard and are hoping to get picked for the minors or to head off to University on a hockey scholarship.  The arenas however, leave a lot to be desired from the lighting perspective.  This isn't the Air Canada Centre, the Aurora Community Centre is lit by banks of T8 fluorescent tubes which while white are not particularly bright. I never liked shooting my original 7D beyond 1600 ISO.  After that the noise became annoying and the contrast really started to flatten out.  When I did the test shots with the 7D Mark II, I found that it started to fall off badly after ISO 6400, so I went with the intent to shoot the whole game at ISO 3200.

The camera was set to aperture priority with the lens cranked wide open to f:/2.8.  ISO was set to 3200 and exposure compensation was +1 ⅓ stops.  I hope that this would give me decent enough shutter speeds to freeze action without turning every image into a grainy sack of mush.

Let me say up front that I am not yet acclimated to the 7D Mark II.  Enough has changed to put me behind the curve on it.  Some things are similar to other cameras such as the Case options for AF similar to those in the 1Dx.  When I shoot the 1Dx, I use Case 4 AF and did the same on the 7D Mk II.

My go to kit for hockey up to now has been the 1D Mk IV with a Sigma 120-300/2.8 stabilized lens at ISO 2500.  The Mark IV does a great job and the 1.3 crop gives me up to 390mm effective focal length, that I rarely use.  The 7D Mk II, has a 1.6 crop factor so with the 70-200 that should have ended up about 320mm.  First learning. For a recreational hockey arena where I want tight shots and not to have to crop away dead space more than 30%, 320mm is too short.  So next time out, the Sigma 120-300 is back on point.

The AF in the 7D Mark II is very fast.  It is not fast like the 1Dx but comparable in AF performance to the 1D Mark IV and that's very good indeed.  I was a bit off my game having not shot hockey in a while so I felt out of sync a bit and it showed in the images.  Shots were clean in the viewfinder and accurate on the LCD.

I shot in RAW (as I always do) and using a Sandisk 32GB Extreme card rated at 120 MB/s I never managed to fill the buffer.  I did find that high speed burst at 10fps was overkill and low speed at 3fps was inadequate.  Fortunately the 7D Mark II allows you to set your low speed burst rate.

I tried the anti-flicker setting on the camera.  I honestly cannot tell if it made a difference at all so next time I shoot without it.  I've also programmed the camera for back button focus only because I found that having focus on the shutter button resulted in extra frames because the trigger is a bit light compared to either of the 1D models that I have.

I set the camera to AWB and that worked out pretty darn well and left the Auto Lighting Optimizer turned off.  Never have found a real use for that since I tend to expose to the right most of the time.    Since I shoot RAW I don't worry about the colour space or picture style crap but I do set AdobeRGB and Neutral if only to get the LCD JPEG to look as much like the RAW as possible.

About 700 frames knocked two batteries in the grip down to about 75% so decent enough performance.  Shots on the LCD looked fine but Canon has changed the Info display and it no longer tells me the information I want to see the way I want to see it.  Instead they have replaced it with a scrolled display that shows all the JPEG setting cruft instead of the basic exposure info with a full sized image.  Those Canon folks build a nice camera, but they still do not understand User Interface.

The game was heavily dominated by the Aurora Tigers until the third period so I did not get the variety of images I would have preferred but that happens sometimes.

I pulled the CF card and put it into my card reader to import the images to Lightroom and to my horror, every image looked like it was on an acid trip to LSD World.  Arrrggghhh!  So I tried Photo Mechanic.  Arrrrgggghhh!  Then I decided to stick a fork in my eye and try to get the current Digital Photo Professional from Canon's site since Mac's don't come with DVD drives.  No problem so long as I manually TYPE IN THE THE FRICKING SERIAL NUMBER FOR EVERY DOWNLOAD!  Canon I have two words for you numbnutz and the first word rhymes with truck.  No one would actually steal your crappy software, so pull hard and reverse the cranio-rectal inversion you are suffering from.  Jerks.

Well that didn't work either.  But I knew that the 7D Mark II could save in RAW and to both cards and it worked, so I pulled the card from the Lexar USB 3 Card Reader on Mac Pro the cylinder and went down to the studio to try it in the Lexar Firewire Card Reader on Mac Pro the cheese grater.  Every image is just fine.  Hmmm

Is it the Lexar USB 3 reader?  Is it something in the new Mac Pro?  Is it some ghost in the machine?  I went back upstairs and put the SD card in the reader.  It has some RAW images on it.  They imported fine.  Hmmm I plugged the CF card into the reader again and checked again.  Everything is perfect.  Two hours lost in failed imports and assorted futzing about but it all worked the second time.  I still don't know why but have made a note to myself that unless I am in a rush, to use the cheese grater and push the RAW files right to the NAS and import them from there, rather than off the card reader.  Maybe the card is too fast for the reader on LR import.  Still don't know.

Anyhoo.  Lightroom does actually have a RAW converter for the 7D Mark II.  I am not certain that it is a GOOD RAW converter yet.  As yet, DXO does not have a RAW converter for the 7D, it's due in December.  I have found on other occasions that the DXO RAW converter does a better job than the Adobe one.  I did try Apple's RAW Converter with Aperture and I think it did a better job.  RAW conversion is a big deal to me, and even after post processing, I found the Lightroom files kind of flat, whereas the Aperture versions were better and with a lot less work.

So what about the noise?  Well when I did the studio test using studio heads in big light shapers, the 7D Mark II was excellent to 6400 ISO.  I was less impressed with it in crappy lighting in the arena.  For higher ISOs to look good, you need good light with decent contrast and I just wasn't getting that in the arena.  Noise at 3200 for hockey is about the same as the noise at 6400 with studio lighting.  Still a long way better than the original 7D, but not as good as I hoped it would be.

In fairness, I need to give it another shot.  I may take a trip to the Ray Twinney Centre to shoot a Hurricanes game.  The Hurricanes are my hometown team but the current owners are challenging and I gave up shooting the team about a year ago because for every nag with the Canes, the Tigers arena and people are welcoming.  Sadly the Twinney Centre has better lighting.  I will also turn that flicker thing off and try shooting with the longer glass to eliminate the need for so much dead space cropping.  I was hopeful to avoid the weight of the 120-300/2.8 and it's required monopod but I will give it a shot regardless.

I've attached a few images from the culled stack, none are awesome but they will give you a sense of what you can expect.  All images were processed in Lightroom for a minor exposure bump of +⅓, lifting of the shadows a bit, increased clarity, pushing the black point left and lifting the white point marginally.  Clarity and a bit of vibrance were added.  The image then round-tripped through Nik Sharpener Pro 3 and Nik Dfine 2 noise reduction.

Thanks for reading and until next time, peace.

Ross

STUDIO TEST : Canon 7D Mark II ISO Performance

Ever since I received my Canon 7D Mark II, I have been itching to see what its real high ISO performance looked like.  I could have tried this with JPEGs but I just couldn't bring myself to do it.  Fortunately, the day I write this, Adobe has released Lightroom 5.7 and the latest Camera RAW that directly supports the new RAW format.  Let's see what I learned.Canon's 7D Mark II produces crop sensor delivered images that are approximately 20 megapixels.  Dimensions are 3648 x 5472 pixels per frame.  This is a standard 2:3 aspect ratio, the same as a full frame sensor.  File sizes at ISO 100 were about 21MB each growing to 35.2MB by the time I got to ISO 51200.  This isn't surprising because the greater amount of noise requires more data points so larger files. The Test Shots

I put the Canon 7D Mark II on a Manfrotto 496 ball head mounted to one of their carbon fibre leg sets.  Usually I use Really Right Stuff but sadly the L-Bracket for the 7D Mark II is backordered so far.  I attached a Canon electronic cable release to minimize camera shake even while on the tripod.  I have found microshake even on this tripod at shutter speeds as fast as 1/13 second, so it's a good idea that you always use a release cable when shooting slow speeds even on a tripod.

I used Canon's 85mm f:/1.2L lens for each image.  While the 85/1.2 produces stunning bokeh, the purpose was to test ISO performance so I set a middle aperture of f:/11 for every shot.  Once I had the depth of field I wanted, I set up the lights.  Because I knew I would be running the gamut from slow to fast shutter speeds, well past the camera's native flash sync, and not wanting to get into High Speed Sync complexity I decided on using continuous light, so I set up the Westcott Spiderlite TD-5 with an 18" x 24" softbox slightly up and 45 degrees left of my usual model Sondra.  Distance from the front diffuser to Sondra was about 2 feet.  On Sondra's left and 1 foot away was a Lastolite Trigrip Reflector clamped with a Manfrotto Spring Clamp mounted on a light stand, using the white/silver striped surface.  I didn't want a really punchy reflector, but more snap than plain white.

Once the light and reflector were placed, and Sondra was in position, I took incident light readings with the dome of the Sekonic 478DR placed at Sondra's chin and pointed at the lens.  I was taught this positioning by Frank Doorhof as this measurement will make the cheekbones just a bit brighter because of the relative distance from the source.  Frank was right, and now it's my standard practice when the light is above the subject.

Once I had my meter reading for ISO 100, I made the first exposure.  For each subsequent exposure, I simply doubled the ISO and halved the shutter speed.  I did check each change with the light meter to verify my math was correct.

The results were very good.  The 7D Mark II delivers a significant improvement in image quality at higher ISOs than the original 7D.  Since the camera will be used most aggressively by wildlife and sports photographers who often have to deal with crappy light, this is a real boon.

To be fair, while it is much better than its predecessor, it's not the high ISO performance you will get out of a Canon 1Dx, Nikon D4s or the respected Prince of Darkness, Nikon's Df, a camera I reviewed and continue to say you can shoot all day long at ISO 25600 and get really good images.

But, the 7D Mark II doesn't go near the price territory of those cameras either, and it's not full frame with larger pixels to deal with the lower light levels.

In the gallery attached you can see images where the only things that change are the ISO and the shutter speed.  Since it is all continuous light, there is no quality shift caused by different shutter speeds so you get a fair representation of the ISO performance.  I started at ISO 100 and by doubling the ISO at each frame got to the camera maximum of 51200 in ten frames.

You can click on any image to make it larger, and as you mouse over, a caption will appear to share the relevant EXIF data.  As I shoot OJHL hockey in arenas where the lighting is often questionable, I used to be concerned about pushing the original 7D past ISO 1600.  Based on this initial test, I am quite comfortable that I will be able to shoot at 6400 and get good images.  By reasonable post-processing, I am confident that I can really make the noise irrelevant.  The images posted here have only had two modifications done in post-processing.  They all have a common white balance set custom using a reading off the grey background, and they all have had the Lightroom lens correction for the 85/1.2 applied, not that it does very much at all.  No other tweaks were applied so this really is the RAW output exported as JPEGs 1024px long side at 72dpi for the web.

Conclusions

This is not meant to be a comprehensive review of the 7D Mark II.  It is a fairly comprehensive single light source test of the ISO performance of this body with a decent lens mounted to it and constraints placed on the camera position and the lens aperture.  Reviews of any kind are always subjective, and in my opinion, the photographer who shoots, Canon, and wants a tough high performance DSLR body with a crop sensor, and who also needs really good low light performance will not go wrong with a 7D Mark II.

Next test will be video, and it will be a bit unfair because the comparison will be with my original 7D hopped up with Magic Lantern video firmware.  I will keep you all posted.