

Display Calibration - only the first step
/
The Datacolor SpyderX Elite is one of a few excellent display calibration devices
Those who like editing invariably look at calibration tools. They do a great job but many users aren’t happy with the results especially when printing. Why didn’t the calibration device work?
What is a Display Calibration device?
These devices, sometimes called a colorimeter, read test colours sent to the display and measure the colour and construct an adjustment to bring the actual display into alignment with what the screen should show. The system will do primary colours, then secondary colours, then grey scale. Once this work is done, the correction settings are sent to the operating system to apply when the display is in use.
Some of these devices will also measure the brightness in the room where the test is being taken. The software will often make suggestions as to screen brightness in the hope that setting this will result in a good general look when edited images are exported for use on other screens or displays.
There are a limited number of makers of these devices and those that remain are all good products. The software does not change very often, because patch colour does not change, so most software updates are related to dealing with operating system patches and version changes.
Requirements for Success
All makers document the core success requirements but many folks don’t read manuals. Here are the basic rules.
No light should be shining directly on the screen
There should not be a bright source behind the display (this is psychological not technical)
Contrast should be set at a medium level
Screen brightness should be quite low
Editing location should not be bright, nor does it need to be completely dark
Why Calibration Does Not Guarantee Good Prints
Display Calibration devices do not balance the brightness of a display for printing. They only do so, and only at a vague level, to get the screen brightness in the range to produce edited images that look decent on other displays from a brightness perspective. This is why display calibration is only the first step in a calibration process.
Many owners do not understand this fact and assume that when their prints “are too dark” there is something wrong with their printer. The reality is that a print, all things being equal, is a very accurate representation of what the edited file prescribes. In simple teams, the print is always right.

It works. Sort of. But you’re guessing
If you believe that your prints are too dark, there is nothing wrong with the printer. The display is too bright. Adobe knows this and even builds a brightness slider into Lightroom’s print module as a quick fix to prints that are too dark. Many educators even go so far as to suggest that as a general practice, one should always set the brightness slider in the print module to +20 as a default.
This works ok for some people, but serious printers determine that it’s more like horseshoes than precision. The right answer is to turn the brightness of the display down. Some users then say that the display is too dark to work on, which is not the display, but the amount of light in the room where the editing is being done. Make the room darker and that problem is solved.
How to Check Your Prints
You should always do a nozzle check on your printer to ensure that the heads are not clogged and that ink flows properly.
If it’s been a while, it’s a good idea to print a colour patch test. You can find these files in a variety of locations. Ensure that you are using the correct ICC profile for the printer and paper that you are printing on. If you don’t bother with that, you have nothing to complain about. Take the colour patch print, let it dry for 15 minutes if you are using resin coated paper and then compare it to a known good colour patch print. All things being equal they are going to look alike. Remember, the print is correct. If it looks wrong on the display then the display is wrong.
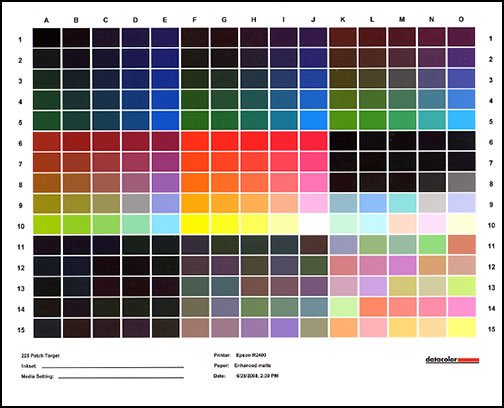
Datacolor Patch Test
Take your successful patch print and adjust the display brightness to bring it as close to the print as possible. Remember that they will never match exactly. The display will always look like it has more pop. The display is transmissive. It is transmitting light into your eye. Prints are reflective, they reflect what light there is into your eye. This is why it’s important to get your room light as neutral as possible. Adjustable LED panels bounced off a white ceiling is a relatively inexpensive route and delivers consistent colour regardless of time of day. Light coming through a window is not consistent at all so if you are using it, you are going to find things vary.
You may feel that the display is a bit dark. Turn down the room lighting.
While this may sound like a hassle, it is key to getting great prints without burning through a lot of ink and a lot of photo paper. The illusion that you should use cheap paper to get close and then switch to your final paper, will actually make it more work for you and will take more time.
Conclusions
Should you have a display calibrator? If you are spending any amount of time doing photo editing, then the answer is yes, and you should be recalibrating your display at minimum once a month. As the display gets older, recalibrate more often. Remember that print ink has a best before date and old inks shift in colour so even if your print file is correct, you could get prints that do not look right.
Do you have an idea for an article, tutorial, video or podcast? Do you have an imaging question unrelated to this article? Send me an email directly at ross@thephotovideoguy.ca or post in the comments. When you email your questions on any imaging topic, I will try to respond within a day.
If you shop with B&H Photo Video, please consider doing so through the link on thephotovideoguy.ca as this helps support my efforts and has no negative impact whatsoever on your shopping experience.
If you find the podcast, videos or articles of value, consider clicking the Donation tab in the sidebar of the website and buy me a coffee. Your donation goes to help me keep things going.
Click this link to submit your questions
I'm Ross Chevalier, thanks for reading, watching and listening and until next time, peace.


