2015 : 10 Ideas to Improve Your Photography

nov_13_2014_09.jpg

As artists, we all want to improve our skills, to improve our abilities with our craft, and to grow as artists.  For your thoughts and perhaps inspiration, I offer the following 10 Ideas to Improve Your Photography in 2015. 1.  Don't trap yourself in filler projects.  A 365 sounds like a good idea until you get tired of it.  Same thing happens with a forced deliverable such as shoot everything with the 50mm.  Forcing your creativity into a box never spawns more real creativity.

2.  Find and tell your own stories.  Repetition may be the mother of skill, but if all you do is replicate someone else's hard work, you cheat yourself of your own innovation and interesting ideas.

3.  Post only your best work.  There's no award for volume, so set your own bar very high.  If you like it, it's worth posting.

4.  Get out of your own comfort zone.  Shoot something you would never normally do.  If you mostly do still life, go shoot sports.  If you shoot only action, shoot a still life.  The steps you go through to master the uncomfortable will make you better at the things that you like.

5.  Assign yourself projects.  Certainly clubs, communities and myriad groups can keep you busy with topic of the day, or the week or the month challenges, but they aren't your projects.  You are building them for someone else.  Build for yourself.  A project can be simple such as shoot to get 10 keepers with a 24mm focal length, all at different lens openings.

6.  Take a notebook with you when you photograph.  Write down jot notes about what you were thinking when you made the photograph.  Don't worry about recording settings, they are in the EXIF data and in the long term won't matter much anyway.  Record your mental perspective or the feeling you had.

7.  Take an image you really like and produce 5 completely different interpretations of it using your digital darkroom to tell 5 different stories with the same core image.

8.  Using only a flexible desk lamp, experiment with different lighting positions on the same subject, using light and shadow to tell different stories and to set different moods.

9.  Carry a camera everywhere you go for one week, shooting anything that you see that is interesting to you.  If something catches your eye, shoot it, and try to use a focal length that mimics your eye, something in the 35mm to 50mm effective focal length range.

10.  Shoot video clips.  Don't worry about the audio.  Shooting motion will give you a greater appreciation of the power of a great still.  Make a hybrid project containing your clips, some stills and overlay some music.  Your computer likely came with all the software you could need to do this.

Above all else, have fun, and make photos.

Perspectives on Photoshop World 2014 Las Vegas

pswpp_w699_h367.jpg

So straight up, I am a huge believer in the work that the people at KelbyOne do when it comes to photographic and related software training.  They have been in my personal experience, unfailingly supportive, friendly and consistently deliver great content.  I just returned this morning on the red-eye from Las Vegas and wanted to get my thoughts down before I fell asleep (again). I flew in a bit early because there is a lot of interesting stuff to shoot in the Las Vegas area, especially if you are willing to get off the strip.  In truth, I shot nothing on the Strip at all, it's not really my scene.  I did do a helicopter trip to the Grand Canyon, went to the Valley of Fire for sunrise, went to the Neon Sign Graveyard and also did a Pre-Con workshop with the inestimable #JoeMcNally.  The Pre-Con is an add-on package to Photoshop World and if there is one you want to do are well worth the time and money.  My friends Isabel and Stephanie did a Pre-Con on light painting with Dave Black and said it was really good.

For those who've never been, Photoshop World #PSW14 is the firehose of training.  You choose your tracks, your instructors, your classes.  Show up awake, and prepare to drown in knowledge transfer.

This year, I want to thank Glyn Dewis, Jim DiVitale, Joe Glyda, Raphael "RC" Concepcion, Roberto Valenzuela, David Ziser, Dave Cuerdon, Jason Groupp, Dave Black, Moose Petersen, Julianne Kost, and of course, Sergeant Major Joe McNally (rank earned while he was "encouraging" us during his workshop) for delivering superb content in a friendly and powerful manner.   I'd like to thank Bill Fortney for pointing out again that Moose Petersen suffers because people confuse me for him.  (He's the one with talent!)

Classes start right after the Keynote and run into the early evening.  PSW also has a welcome reception where you can have a beverage with the instructors the first night, a party (if so inclined) the second night, a Midnight Madness bash the third night and a big wrap up with videos and prizes as the closing event.  There is a tradeshow floor with plenty of vendors to talk to as well.

One of my favourite events is The Art of Digital Photography where some of the instructors present their personal best in a slideshow format.   Dave Black always manages to pull tears and did so again with his moving tribute to Michelle Kwan.  McNally is always disarmingly funny.  Di Vitale always kicks off and shows why he is the master of the composite.  Julianne typically does her presentation in parts and is one of the few who really make iphonography truly impressive.  Joe Glyda, always has a personal assignment, this time was a dam assignment from the Hoover Dam that was peppered with Joe's moderately bent sense of humour.  First time presenter Bill Fortney showed his beautiful Americana landscape and macro work.  The session is always closed by Moose whose images remind us why he so loved as a landscape artist.

The Kelby team do a great job at organization managing over 3,000 attendees with people whose full time jobs at Kelby Media have nothing to do with events management.   There are always some hiccups but I find that when you ask politely, most of the time things are sorted immediately.

The Las Vegas event is at the Mandalay Bay so the hotel is connected to the conference which adds convenience.  Las Vegas certainly has the hotel space for a conference this size and is a fairly reasonable plane ride.  Food and activities are very expensive however as the entire goal of the city appears to be to separate you from your money as fast as possible.  I've attended PSW in Washington DC, Orlando and Atlanta and found it more economical but definitely not as convenient.

Up to now, PSW has happened twice per year.  It looks like there will be only one in 2015, August 10-13 in Las Vegas.  Given the amount of work, and the incredible coordination required, I can certainly see the rationale for consolidation.

The big question people ask me is if it's worth it.  I have to say yes.  Consider it a $2000 investment in yourself.  You have airfare, hotel and attendance not including meals and any other entertainment, but I don't see any other option to get this much variety in training, with this pantheon of instructors anywhere else.  Jason Groupp did advise that WPPI is a larger event, focused on Wedding and Portrait photography and that may be an alternative if one of those is your specialty.  I like that at PSW I can learn about pretty much anything in the realm of photography and software editing from a wide variety of instructors and know that their content is backed up by superb video training online.

What would I change if asked?  I would definitely look at making the Pre-Cons a two day event.  While they are an extra cost, I would definitely do two, because of the actual photography involved under the leadership of great instructors.  Consider this.  The Pre Con with Joe McNally cost less than some lesser known offerings of similar duration.  And it was with Joe McNally.  Joe was there early and his entire crew built us 6 different sets, arranged the talented artists to be there and did all the setup, and provided all the lighting.  Big thanks to John and MD, a huge shake for my friend Michael Cali, and also a cheer for Joe's wife Annie.  I have done a number of classes and workshops with Joe and I ALWAYS learn something new.  Here are a few of my own images from that workshop

McNallyWkshop-028 McNallyWkshop-043-Edit McNallyWkshop-046-Edit McNallyWkshop-056-Edit McNallyWkshop-094-Edit

I would also suggest that the classes explicitly advise whether they are tutorials or slideshows.    My personal preference is the tutorial and my hat goes off to my new mate Glyn Dewis who in addition to being a brilliant teacher is one of the nicest fellows I have ever met.  He is incredibly gracious and easy to talk to.

If your eyes are beginning to strain or you like to take notes, the ProPass option (extra $$$) is definitely worth it.  You get early access to front row seating, early entry to the keynote, a ticket to the event party, some swag and a discount coupon for the Kelby bookstore.  Corey Barker's latest book moved from $42 to just over $10 for me as a result.

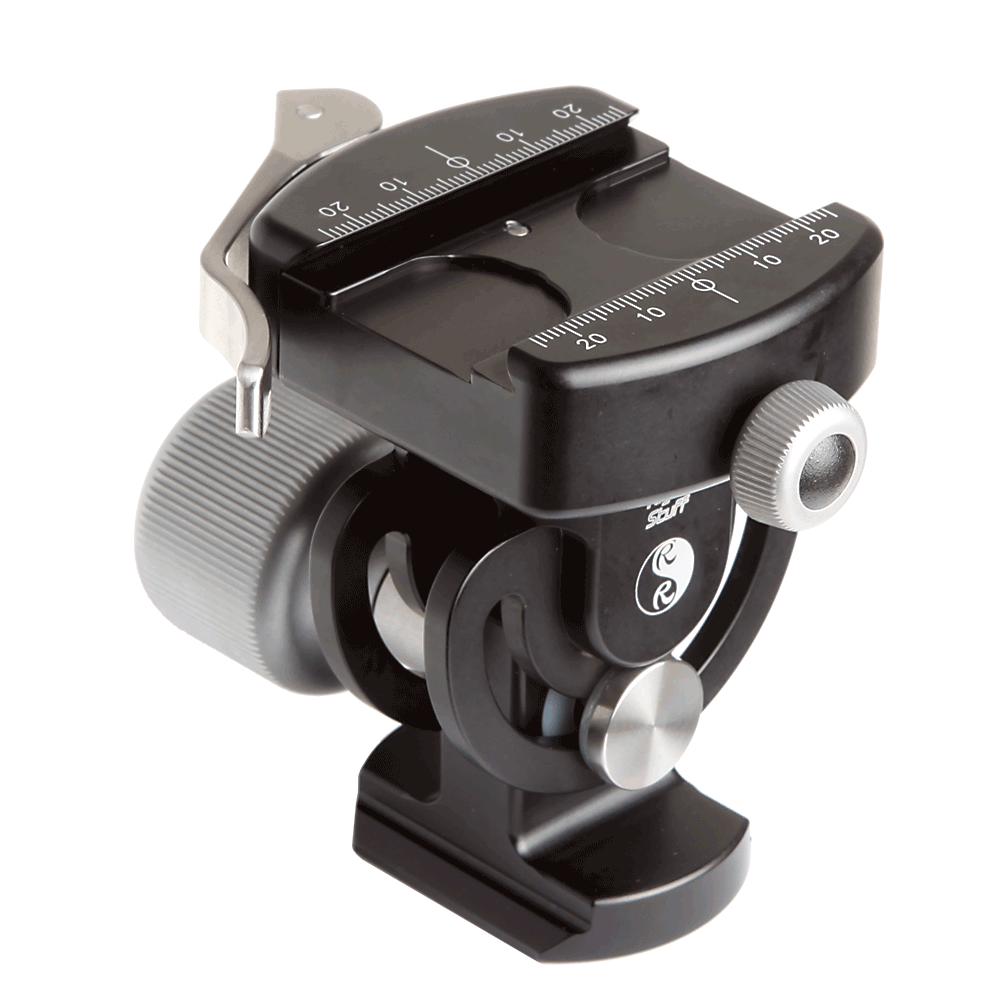
In the years that I have been going, the tradeshow floor has gotten smaller with fewer vendors showing up.  I doubt that Kelby Media is hosing anybody to be there but it would be nice to see a lot more vendors and more vendors with actual stock to sell.  Ordering over the Internet may be the way that many people shop, but sometimes personal service should turn into an immediate reward.  A big shoutout to my buddy Joe Johnson Jr, and the rest of the great people at Really Right Stuff for the time that they spent with Isabel and Stephanie, talking about the best route for tripods and supports.  I think everyone knows that I believe that the products from RRS are the best on the planet.  Their new video head is really impressive and Joe said he was going to send me one of their new sliders for a heavy duty evaluation.  I was also very impressed by the Phottix line of products.  Jason had never laid hands on the Mitros+ flashes before and was getting great multi flash radio controlled TTL exposures in his class in minutes.  The user interface could not be simpler.  The Mitros+ sells for about $400 and is as powerful as a top line Nikon or Canon TTL flash but also includes a radio transceiver built into each unit.  For those who already own a bunch of TTL flashes but want the efficiency of radio instead of infrared (I still stand by my statement that just because Joe McNally can make infrared work at 100', the rest of us develop apoplexy trying to make it work at distances greater than 10'), the Phottix ODIN system gives group controls, radio transceiver, channel flexibility and much more.  I will be pushing on my Canadian affiliate partner Henry's to start carrying these units in Canada.  Phottix also has this really cool collapsible beauty dish that is very impressive.  RC stopped by and he talked to me about it at some length.  Sadly B&C and Hunt were sold out and B&H was only doing web orders.  Hopefully we will see these locally soon enough.

Some attendees say that the event should be longer.  I think an extra day of pre-conference and one more day of classes would be ideal.  Of course I would then need several days to recover and would definitely look for transport other than the sardine tin crush of Air Canada Rouge.  That is a really horrible travel experience despite the great attitudes displayed by the flight attendants.   It would be easier of course if other travellers did not think that a small automobile qualified as a carry on and learned that one carryon and one personal item are not the same as four pieces of monster hardshell luggage.  And a screaming baby is neither appreciated or wanted by ANY other passenger.

I need to thank Moose for his sense of humour and for having his photo taken with me to help direct people to the real Moose Petersen.

I suppose I should disclose that the old line "what happens in Vegas, stays in Vegas" should be modified to "what happens in Vegas, ends nearly immediately in Vegas" so before either Steph or Isabel post anything (they are on a plane as I write this), I did actually get married in Vegas to a lovely lady named JaneMarie courtesy of the very talented wedding photographer and instructor Jason Groupp.  Fortunately for JaneMarie, the wedding was annulled before class was over.

Photoshop World returns to Las Vegas in August 2015.  You should go.  It's in my plan now.

The Scintilla of Difference

divine_fire_spark.jpg

I was recently watching a session with one of my personal favourite instructors and photographers, Mr. Joe McNally, and he used this phrase in part of his discourse.  He described it as the difference that sets your work apart from all the other folks doing something very similar.   As he often does, a word from Joe prompts me to think deeply about a concept.  Want to learn all about this? Scintilla means a tiny trace, or spark, of a specified quality or feeling. What sets a great photograph apart from a good photograph is the scintilla of difference.

Think of this.  How many sunset photos have you seen?  How many have you shot yourself?  After being involved in photography for over 35 years, I've made more than enough images myself and when I worked a long time ago in photographic retail when film processing was a big deal, I saw literally thousands of sunsets.  To the person who made them, each of them was wonderful and special.

The question to ask is, do they set themselves off differently from every other sunset?  We have all seen a sunset that was beautiful or majestic or had amazing colour.   We've probably made images of them.  They may still ring great bells for us, but most of the time that is because they act as a mnemonic trigger, releasing the memory of what was happening and how the shooter felt at the time the photo was made.  For those without the memory, it's a pretty picture.  Probably.  Or it might be the ten thousandth sunset picture that they have seen and they are now so jaded by sunsets they could care less if they ever see another sunset image.

This leads to the next major step in our own development as artists and as our own photo editor.  There is nothing wrong at all with liking one of your images.  There is nothing wrong with you printing an image of a sunset and hanging it in your home if it matters to you. The question is whether it belongs in your portfolio or your online archive of work.  If it's just another beautiful sunset, where its only power is your personal mnemonic trigger, then the answer is probably not.   We've talked a lot at the camera club and in my private classes about the importance of framework in the work you publish.  Does the image tell a story that a viewer can clearly understand?  Does the image provide a framework where the viewer can write his or her own interesting story?   At a recent club challenge, local photographer Bill Bell shared a street image he made in Paris.  It was extremely well received and not for the technical excellence.  What made the photo special was the framework created so the viewer could write his or her own story about the woman in the image.  About ten members offered their perspective and their stories were different each time.  If Bill knew the real story, he smartly kept it to himself, the viewer's own stories being much more poignant and relevant to them.

Great photos have this spark, this scintilla of difference that sets them apart.  I think of Alfred Eisenstadt's images of Marilyn Monroe in her back yard, Arnold Newman's portrait of Igor Stravinsky, Gregory Heisler's image of Muhammad Ali, John Paul Caponigro's work in Iceland or Moose Peterson's bear series.  There's a certain something that sets those images apart, something that the artist has seen and made available to the viewer, even when separated by decades as with much of Eisie's work (Alfred Eisenstadt's book Witness to our Time was my personal inspiration to take up photography).

Social media encourages people to publish everything.  When Google + first started up the Food Photography community, the work was fascinating and you could see that the publishers were trying to tell a story or show a set up or coach newer shooters on a process.   Now it is a near endless movie of out of focus, poorly exposed, badly composed photos of people's lunch.

One of my friends, Valerie, really enjoys flowers.  She grows them, she hunts them and she photographs them.   This is a very hard gig, and Valerie only does this to please herself.  Any photo editor will tell you that if you put an image of a flower in your portfolio it had better blow the doors off, because flowers are naturally beautiful.  Your image has to do more than just replicate the beauty.   Yet every day there are thousands of pictures of very beautiful flowers published on social media.  They are beautiful.  And they look like every other one with very rare exception.  When Valerie puts her artist into a flower image, there's more there than a beautiful flower, and for the image to have any weight at all, there has to be.

As a student, a teacher, a mentee and a mentor, I search for the scintilla of difference.  I've missed great images because I was too busy focusing on getting a great image.  I've made hundreds of images while doing an assignment and come back with nothing.  When mentees ask how many keepers I have at the end of a day, I tell them that I have had a very good day if I retain 6%.  I have worked very hard to be a very tough editor of my own work.  I don't publish often and I am very lucky that when I do, I receive the kind of critiques I need to get better.  Coming full circle, the best instructor I have ever seen give critique is Joe McNally.  He is clear, he is direct but he is never demeaning or arrogant.  I like to believe that I have developed my own critique style based on what I have learned from Joe and also what not to do by watching other critiques, the providers going unnamed so as not to be rude.

So that's the challenge gentle readers.  Before you publish, heck before you even start post processing, does the image have the scintilla of difference that will set it apart, does it have the spark, that raises it above the fog?

Later

PS, could we all agree to remove the phrase "awesome capture" completely from our vocabulary as it is both meaningless and trite.

Removing the Creative Blockage

We've all been there as artists and creatives.  The place where nothing seems to work, where we feel stalled, stuck and perhaps even contemplating moving on to another interest.  I've been there as a photographer, a musician, as an archer, and am there now as a videographer.  It's not the end but it is cusp or inflection point, so I thought I would share how you can get past this point and grow again.Sometimes the easiest answer is to stop and take a break.  I did that a long time ago as a photographer.  I took a break, albeit too long a break.  The photographer I am today is a much better photographer than when I took the long break because in that time, I learned a lot, and apparently I am a slow learner. That Won't Work

I hear very often this very statement from folks I am mentoring, or students in a class or other people out on a shoot.  I offer the following guarantee.  If you say this, even mentally, you're right.  Don't even bother trying, you've already decided.  Sound foolish?  It is.  Stephen J. Covey made lots of people rebuild their thought patterns by encouraging them to start with the end in mind.  There is a ZEN principle, that says to envision the end before the start.  If your envisioned end doesn't work, you'll get there.

I Will Probably Fail

I surely hope so.  We are not expert at anything the first time we do it.  Or perhaps not even the thousandth time we do it.  While focused repetition can be the mother of skill, failing to fail is a guarantee of not learning anything.  To quote Alfred Pennyworth, "Why do we fall?  So we can learn to get back up."

I Don't Know How

At one time this is true for everything we do.  If you have learned to walk, at one time you could not.  If you read, at one time you did not.  If you speak a language at one time you could not.  None of these skills burst fully formed into existence.  We learned.  It took time.  We practiced.  We got better.  How is this different from art?  Does the great pianist play Rachmaninoff on the first day?  Was Adams' first image of Half Dome also his last image?   Focused repetition is the mother of skill and the availability of the knowledge to do new things is more available today than it has ever been.  That knowledge is not an end in itself, it is a tool to help you extend your creativity.

It Might Not Turn Out

Oh paean to negativity...  This very statement says that it might actually turn out.  So do it.  With a bit of positive orientation, it might just turn out, and if it doesn't you could be a step closer to when it does.  When I get an idea or concept in mind, I don't get there in one image capture.  It can take lots.  Sometimes so many I wonder why I keep trying.  But I get there often enough to keep going.  I don't play golf, but I am told by those who do that the one great shot makes up for the hundreds of truly horrible ones.

What If No One Likes It?

And to this I say, who the heck cares?   Van Gogh wasn't painting for someone else's pleasure, he painted because he had to, for himself.  By the way, he was not well appreciated in his lifetime, but now, hoo boy, major artist that fellow.  I know that it sounds anti-social but if you are making art with the primary goal of pleasing anyone other than yourself, you've started with the wrong end in mind.

I Don't Have Anything to Post Today

Good for you.  Be honest.  If you look at the tidal wave of images on social media. how many really capture you?  How many times do you plus or thumbs up something, purely because some one did that for you or you think you have some kind of social obligation to do so.  "Liking" stuff that you really don't like is destructive to your creativity.  It lowers the bar for acceptability and inhibits your ability to strive.  Don't get me wrong, I see some really compelling pieces of art when I bother to look at social media.  But those are the gems in an ocean of dreck that does nothing for me other than make my eyes hurt.  If you aren't posting every day, that doesn't make you a bad artist, it makes you honest and selective and by the way scarcity makes work more in demand than abundance.

I Cannot Think of Anything to Shoot

Right again.   Try this.  Stop thinking so hard about what to go shoot and just go shoot.  See with your mind open and something will reveal itself.  When I ride the motorcycle, I rarely take a camera because if I did, and if I stopped every time I saw something I would never get anywhere.  I make mental notes of what was revealed and will go back with time or seek out a similar reveal.  I need to stop more in the moment and count on seeing it again less.  It may not be there again.

My Work Will Not Be Well Received

If by this you mean that someone won't like your work, you're right and if you let this stop you, well you've made an intellectual decision to stop and let the voice of another change your existence.  It's a fact of life that for every piece of art, there is someone who hates it and that someone is probably the classless type of bottom feeder that he or she feels that others want to hear what he or she has to say.   A critique can be very useful.  A critic is good for organ donation.  And by the way, just because someone offers you a critique, sanctioned or not, the virtue of its existence does not make it valid, unless you decide it to be so.

Making Art Seems So Selfish and Everyone Knows Selfishness is Bad

I'm not sure who "everyone" is but they need to be drowned and soon.  No person can add value to anything before that person values and cares about himself or herself.  If you place no worth on yourself, you cannot place worth on anything else.  That's a parasite. Art is by definition selfish.  You make it yourself.  No one else makes your art.

Trust Yourself and Go Do

Not to be all Yoda-like but there really is no try, there is do or do not. The greatest barrier to creativity often lives between our own ears.  We create our own walls, often more formidable than those that others might try to erect in front of us.  For most readers, photography exists in a space covering hobby to passion to source of income.   There are always those who will criticize, not as help but as a way to exert power you grant them over you.  There's a two word phrase for those folks, and you are all smart enough to figure it out for yourself.

So go do.  You will love some of the work you do.  You will hate some of it.  You  will be thrilled.  You will be saddened.  Welcome to the human race.  Others may have more skills in some areas but they won't have your eye, so go make your own work seen with your own eye.  Do new things, do old things, do different things, do the same thing, just go do.   If that sounds like a simple answer, it is.  There really isn't more to it than that.   The best way to breach creative barriers is to recognize that they are of our own creation, and then to tear them down by determining that they add no value.

See the finished work, make the image, edit the image and do what you will with it.  Publish it, print it, hide it away forever, it's all your choice.  Make the choice to create.

Creativity in an Ocean of Tech

I'm just back from the April edition of Photoshop World #PSW in Atlanta Georgia.  This was my fourth Photoshop World and I heard some very different messages from what I have heard in the past.  Posting what I was hearing to Google Plus engendered some "interesting" replies, some positive, some highly negative, and that, in addition to the pushing by my shooting buddy Isabel, has prompted the writing of this article. Photography is, or can be, very technical.  As a founder of a camera club, I constantly hear about concerns for what settings were used for a particular shot.  As an educator, I am frequently asked, what the right aperture or shutter speed is for a particular situation.  As a reviewer of photography and video products, I am asked which is better, or best.

I've struggled with this for a long time.  I can teach technique or explain the physics of light or help people "get" the exposure triangle, but I have been troubled by the tech-centricity of what I see in our photographic world.  Manufacturers assault us with techno-babble, megapixels, focus zones, patterns and rates.  All interesting I suppose and perhaps helpful in a purchase decision but not really relevant to your execution of your craft.

I heard very clearly from photographers and educators that I respect a great deal that basically settings don't matter.  In a one on one, an internationally respected photographer bluntly told me that studying someone else's EXIF was more harm than good.  These messages fly in the face of what many say, and I see educators placing a lot of emphasis on these things, and yet their students are not coming away less frustrated or as better photographers.  If all this stuff is so important, why are these aspiring photographers so unhappy?

When I look at the work that inspired me, and the photographers that created these images, I don't see the settings, I see the final art.  Sharp or soft focus, deep or shallow depth of field, motion blur or not, all these things go to create the story, the character and the emotion of the photograph.  I don't know what settings Eisenstadt used to make the photograph of the skating waiter from Switzerland, and in the end, they don't matter.  What matters is the story that the photograph tells about the time, the place and the culture.  When the world gasped at Steve McCurry's photograph of the Afghan girl as shown on the cover of National Geographic, no one cared about the exposure data.  (It's not published but I am pretty sure it was shot on Kodachrome 64).  What captured the eye was the story, or the framework for the story the viewer created for him or herself based on the facial expression.

Let me make this clear.  Settings matter in so far as they assist you to take a sharp, well-exposed picture.  But having done this for over forty years, you and I know that there are lots of exposure options that will get us a well-exposed picture.  We also know that getting  important subjects sharp is not all that hard, it's been done for well over a century.  Those are table stakes.  You don't get to play the game without them.  A friend of mine does online mentoring.  One of his exercises forces the student to put the camera in Full Auto or Program mode.  Lots of his students feel like their hands are tied.  At first.  My friend Gabriel jokes that the P stands for Photographer.  It doesn't but I suspect that in the minds of the manufacturer's rep it stands for "decent Picture".  Creativity is not forged in knowing your settings or your EXIF, it is only forged in experimentation, in spending time seeing as opposed to playing with dials and buttons.

In my composition classes, I teach the principles of composition.  We all know at least one, typically the Rule of Thirds.  It's not a rule because it's unenforceable, but it is a framework to start from and when all else fails, if you use it, at least your composition has a chance of being interesting.  I find it fascinating when I hear so called educators tell folks who are working to develop their compositional eye, that the rules are there to be broken, so go so far as to add only when you understand the rules can you break them but the general message is that these artistic guides are really worthless and that unfocused rebellion makes for better images.  This is, as you might expect, a crock of poop.

Composition rules will not create your compositional eye.  You won't learn to see solely by following the rules of composition, but they will help you to get away from plopping everything dead centre and you may in fact find that the rules help you build compositions that foster your creative mien rather than restrain it.

There's a big difference between taking a picture and making a photograph, as much as the difference between scribbling with a pencil on a napkin and painting oil on canvas.  The difference is what Canadian great Freeman Patterson calls "Seeing".  Others refer to the process as perceiving.  I don't care what you call it, that is considerably less relevant than that you do it.  I've made photographs where viewers have said "but is that what was really there?"  My answer is "that's what I saw".  The two are not necessarily the same thing.  A made photograph has emotion, a framework, a story.  It's not just visual, you can smell the waves or the flowers, you can hear the wind in the trees, you can feel the sunlight on your face.  I read of an impressionist painter who said he painted music.  And for him, he did.

When I see, I see the potential for finished work, not just what is in the viewfinder.  While I work hard to get things right in camera, I choose to include the digital darkroom as an integral part of my creative process.  The digital darkroom is not where I correct mistakes, although I have done so, it's really where I complete the image.  Just like you, I've encountered people who call the digital darkroom dishonest or fake.  Photoshopping is now a verb, rarely used in positive context, yet if you are really embracing creative experimentation, it's another tool in your creative arsenal.  I've been part of conversations where I hear work described as having been "Nik'd" meaning unduly processed in the Nik suite.  I like the Nik tools but they aren't an end in themselves, they're just a tool and when they are applied the same way to every picture, they aren't helping.  That's not creative it's brute repetition.  Now some would argue that "it's workflow".  I don't see this since by their nature, every image is its own, so how could the same post processing apply to everything the same?   As a creative person, do you reduce every picture you take to effectively hitting it with the same stupid Instagram treatment?

Creativity is colour, and lines and shadows.  It's perspective and perception.  A razor sharp picture of a statue seen from the standing position is evidence, not art.  If all you see is that sharp statue at eye level, feel free to take a picture of it, but that's not making a photograph.

Great photographs aren't great because of shutter speed, or aperture, or ISO or lens or camera.  Those are all just tools and can be used well or poorly by the tool holder.  A great photograph is made.  It answers questions.  I have taken thousands of pictures and so have you where you look at them and go "uh huh, nice, um why did I take this?"  We have to agree to ask the questions up front before banging out 12 frames per second.  Why am I pressing the shutter?  What story do I want to remember?  What story would I like viewers to see?  What message am I trying to send?  What's the relevance of this moment?  Why does it matter?  Who cares or will care about the subject?

To grow as photographers we need to be able to answer these questions and many more.  And, contrary to the proselytizers of "community" and "social" and a bunch of similar and ultimately meaningless buzzwords, the only answer that really matters is your own.  If you are out there trying to make photographs to please others, sorry kiddo, you're doing it wrong.  If you feel sick to your stomach because you haven't posted anything to the social network du jour, stop making yourself sick.  Vivian Maier is now recognized as one of the greatest street photographers of the last century.  She made photographs for her pleasure first and only.  We would never have seen them at all had someone else not discovered them after her passing and had a "oh wow" moment.  She never wanted to "share" or "post"  She was the most honest kind of artist, the kind that doesn't care what someone else thinks.  Would she be pleased to learn how much her work has done for viewers?  I have no idea. My guess is that it wouldn't matter all that much to her.

So let's suppose that growing as an artist and enhancing your craft is important to you.  What do you do?   Look at other photographer's work.  Examine what you like and don't like.  You're right.  Learn to see by asking yourself every day what exactly you see.  You'll be thrilled to learn that you see much more than what is there.  Stop chasing the daily theme on the social network and being driven to post on some bogatz community where the end in mind is not to foster art but to sell you something.  Don't get hung up on settings and EXIF and the latest gewgaw.  Ask the hard questions before you press the shutter.  BUT PRESS THE SHUTTER.  And the only way that really works is if you always have a camera with you.  Certainly to take pictures, but sometimes to step across the line, and to make a photograph.

If there's no emotional commotion, it's not a photograph.

Announcing One To One Training - Portrait, Couples and Executive Photography

I am very pleased to announce a new training offering from The Photo Video Guy. Now available are one to one training classes over a four week period on a variety of topics.  Classes are held live in Newmarket Ontario.  The attendee must have his or her own camera and suitable lens.  Professional grade studio flash, modifiers and continuous light options will be provided for the course.  Here are the first three courses.

Portrait Photography

This program introduces the attendee to the key principles in successful portrait photography.  The attendee will learn;

1.  How to use Lighting to creative effect, including effective light placement, use of reflectors and use of scrims as well as the "Peter Hurley Look" as invented by industry leading headshot photographer Peter Hurley.

2.  How to pose a variety of subjects, men, women, children and babies using proven posing techniques.

3.  How to interact with your subjects to make them feel comfortable and deliver great expressions for great images.

4.  Editing the portraits, including proven techniques to help your subjects feel great about their portraits.

The class is taught by Ross Chevalier, the Photo Video Guy, a former professional and professionally trained photography.  Contact ross@thephotovideoguy.ca to sign up and for more information.

Couples Photography

This program introduces the attendee to the key principles in successful couples photography, suitable for casual portraits and engagement portraits.  The attendee will learn;

1.  How to use Lighting to creative effect, including effective light placement, use of reflectors and how to light two subjects properly so as not to create inappropriate shadows or discomfort for the viewer

2.  How to pose couples for diverse outcomes, casual, engagement, recommitment.

3.  How to interact with your subjects to make them feel comfortable and deliver great expressions for great images.

4.  Editing the portraits, including proven techniques to help your couples feel great about their portraits.

The class is taught by Ross Chevalier, the Photo Video Guy, a former professional and professionally trained photography.  Contact ross@thephotovideoguy.ca to sign up and for more information.

Executive Portraits

This program introduces the attendee to the key principles in successful executive image-making, suitable for web sites, annual reports, and business documentation.  The attendee will learn;

1.  How to use Lighting to creative effect, including effective light placement, use of reflectors and how to light the business leader to convey different moods and communicate different messages

2.  How to pose the business leader to show leadership, poise, openness and negotiating power.

3.  How to lead the executive to deliver great expressions for great images in a compressed time period.

4.  Editing the images, including proven techniques to reinforce the message of the containing documents or web sites.

The class is taught by Ross Chevalier, the Photo Video Guy, a former professional and professionally trained photography.  Contact ross@thephotovideoguy.ca to sign up and for more information.

The Book : How To Shoot Video That Doesn't Suck by Steve Stockman

I was doing a seminar today called Intro to DSLR Video, hosted by Henry's Newmarket.  We had a marvellous turnout and the folks really wanted to learn more about making great video with their cameras.  We spent most of the session on how-to and gear, but a couple asked about a good book on the subject.  So I recommended Steve Stockman's In my opinion, this is one of the greatest cut the crap, get to the point books on how to make interesting videos.  There's little techno-babble and tons of useful guidance on how to shoot video that will not make your audience want to shove forks into their eyes.

I recommend it highly and if you buy it from Amazon through the link below, you help support The Photo Video Guy.


Q & A : What is "Safe" storage

To ask a question of The Photo Video Guy, send an email with your question to ross@thephotovideoguy.ca Rod writes to ask about storing images. "What's the best means of storage and archiving digital photos.  I read your article on thephotoguy.ca about memory cards.  I find the technical info helpful but I also read elsewhere that flash storage is not long-term reliable. "

Great question Rod, let's take a look at the subject.

There are potentially hundreds of opinions on how best to store and keep your digital photos, and videos.  In the old days of digital, owners would have to create their own image management system of directories, folders, naming conventions and the like, and hope that over time the thing was sustainable, manageable and the the owner could actually find something four years down the road.  It was not really viable then and is the worst option now.

The first rule of safe storage is that no single storage mechanism is "safe".  Storage professionals will tell you that no file is really safe until there are three copies of it.  The three copies include the master, the local backup and the offsite backup.

Physical Media

Before we get in to that architectural conversation, I want to address the comment you have heard that flash storage is not long-term reliable.  The real question is what constitutes "long-term".  In the early days of static column RAM integrity was measured in years without a power application to recharge the chips's ability to retain a bit instruction.  With today's flash memory cards such as high end Compact Flash or Secure Digital cards, reliability is superb.  There are numerous indicators where a card has spent six years underwater in the ocean and been readable.  No electronic storage medium is fully protected from data loss due to strong magnetics or degaussers, but reasonably maintained, the flash memory in storage cards will last a long time.  It's NOT suitable as a long term storage mechanism not because of reliability but because of the difficulty in cataloging.

Solid state drives use a different class of flash memory.  They are more reliable than media cards and as of yet, we have not seen any strong indicators of limited life.  They are extremely fast, robust and make an excellent storage medium but you pay a higher price for this sort of storage.

Classic spinning drives are the most common type of storage.  They are very cost-effective, come in enormous sizes and if you buy smart have superb integrity.  To a large extent you do get what you pay for.  Enterprise class spindles cost a LOT more than consumer grade drives.  They tend to be smaller in capacity, but are built to be used heavily.  An example would be Western Digital Velociraptor drives.  Fast, robust and pricey.

For home storage in desktop enclosures, Western Digital Caviar Black series are proven to be very reliable.  The newer Caviar Red drives vary their rotational speed but are built to be always on in Network Attached Storage.  As an archive target, Caviar Reds are good choices.  The less expensive Caviar Green drives are targeted at the "green" client.  I have lost two of five in two years and will never buy another one.  Similarly, I would never buy any drive from Seagate because of execrable reliability.  Hitachi was my go-to favourite drive but they were sold to Western Digital.  You can get these high quality drives in the external drives from G-Tech.

In laptop format drives, SSD is the way to go, albeit at a higher price.  If SSD is too expensive, then the WD high performance drives are a good choice.  If you are looking for a packaged solution, the G-Tech are excellent.  I used to use LaCie drives but I found them to be sufficiently unreliable such that I do not recommend their products to anyone.  Nice enclosures with really cheap drives.

Also popular are local RAID style drive enclosures.  Systems are available from Promise, CalDigit, Synology and Drobo.  RAID style systems can provide for protection from single drive failure by spanning data but recovery can be a real pain in the butt when something goes wrong.  Drobo made a name for themselves originally but having owned two and having had both units go bad more than once in and out of warranty, I would never suggest a Drobo to anyone.  Synology has developed a very good reputation and while their RAID is not proprietary as are some others, it is based on proven Linux models and works very well.  Be careful buying RAID because while it can look very pretty, upgradeability may be limited when you start to run out of space and be sure that data recovery is simple and proven.

The Storage Model

If you have a desktop computer, I recommend putting your photo / video library on a high performance external drive.  If you have a laptop, I recommend putting your photo / video library on a high performance external drive.  If you run Windows, at minimum your interface should be USB3, Thunderbolt if your system supports it.  If you run Macintosh, go Thunderbolt unless you have an older Mac Pro that has no Thunderbolt capability (like me), in which case get the CalDigit USB3 card and go USB3.  I tend not to depend on the internal drives to hold my libraries.  I capture images on the local laptop drive when in the field but transfer them to the library drive when I get home.  Laptop drives tend to be too small to be viable for long term library storage.

The backup drive should also be external, and use the fastest interface your computer can support.  If you use Macintosh, leverage the power of Time Machine to backup your library from the main external to this secondary drive.  If you use Windows, there are lots of backup applications to use, I am not a Windows user anymore, but I know that the Acronis people do very good software and it actually will perform a restore without dying.  Typically the backup drives are larger than the main drives so you can keep multiple versions.  This is a good use for RAID arrays.  They're usually a bit slower but make good backup targets.

The last piece of storage is offsite.  You can buy externals and move them to and from other sites or lockboxes, but the most effective way to do this is with secure cloud backup.  I have tried most of the services and recommend Crashplan above all others.  Your license will cover multiple computers and does not restrict backing up external drives.  Most other cloud services don't do external drives at all or charge extra for the privilege.  Carbonite gets lots of advertising but their pricing model is onerous and they treat external drives like lepers.

Now that you have a good storage model, let's get to cataloging.

In my opinion a photo editor is not necessarily a catalog system.  Photoshop comes with Bridge.  Bridge is a file browser not a catalog system.  It sucks and blows simultaneously.  While there are lots of editors, there are only two serious editors that also have very strong catalog functions and they are Aperture (Macintosh only) and Lightroom (Windows and Macintosh).  I recommend Lightroom to EVERYONE.  It works, there's tons of free training on the web and you can build your own catalog system and let the Lightroom engine do the majority of the work.

in my world, I set up my Lightroom catalog to store files by the date of capture.  This is the default so not a lot of work there.  At time of import, I have Lightroom make a second copy to a completely different drive as well (so I have three local copies plus cloud).  I used to have Lightroom convert to DNG at time of import, I no longer do this.  At time of Import, I use a preset to apply metadata information including my copyright and rights information as well as IPTC information into each file.  I choose to COPY the original into my Lightroom library so Lightroom can act as my organizer.  I use keywords on each import because I typically do an import after each shoot.  I don't leave cards in cameras for multiple shoots. Keywords help me find files after the fact so I include things like shoot information, lens and camera info, model names etc.  Anything that might apply to the entire import.  Once the import is done, I immediately create a collection for the entire import and give it a useful name.  I then create other collections to subdivide the images into easily findable subsets.  If I'm really bored, I will then specifically keyword select photos but this is a lot of work and hasn't made a real difference so I do it less and less.  Collections are for me the most useful of Lightroom's cross-hierarchy model.  The copy process means that I have a Lightroom library of photos, along with a separate Catalog file, both of which that get backed up to the local RAID array.  That original copy sits untouched on that other drive.  It's my last resort local backup.  I then set Crashplan to backup both my Catalog and my Lightroom library to the cloud.  I've done restores from Crashplan as a test and while not speedy, it works.  I've also done test restores from my local backups to be sure that they work as well.

Because of metadata, IPTC, keywords and EXIF, I can search Lightroom using multiple criteria and I can usually find what I am looking for no matter how old in a couple of minutes.  I don't have to build a structure in a folder system or directory because Lightroom does the job for me.  Transitioning to Lightroom is difficult for those who have built robust manual hierarchies because of the perceived loss of control.  It's all in the head of course, the Lightroom catalog is a much more powerful and much richer structure.

This also allows me to use Lightroom as the launch point for all other editing software.  I launch all plugins and Photoshop from within Lightroom.  This means that anything that goes out of Lightroom to an editor round trips back to Lightroom and updates the catalog.

I set Lightroom to optimize and backup the catalog on every exit.  This adds time to the close operation but keeps things running smoothly.  With over 50,000 images in my current library, performance is still good.

Lightroom does support multiple catalogs, but for my volume I don't need to use this function.  If you are making 150K retained images a year, maybe you do.  I also keep things clean by aggressive pruning of the library.  I make time to go through every import and use the X key to reject anything that I would not want to spend time editing right off the bat.  Then I delete the rejected photos.  Remember, I have that copy of everything that was made to the second drive at time of import if I ever really needed something (I never have) so by keeping my library to only good stuff it's fast and effective.

It's a longer answer to Rod's question but the subject warrants.  There are three considerations, physical media, storage architecture and catalog.  Hopefully this post helps you get a system set up that properly leverages all three.

EXERCISE : Learn to "See" Like Your Lens

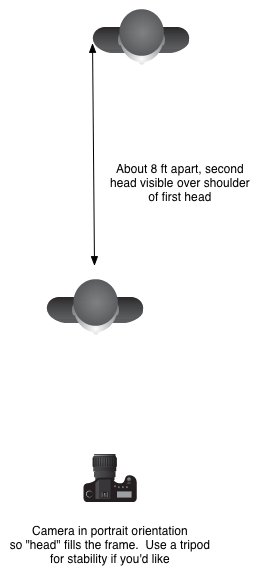
This is a pretty simple exercise that you can do with your lenses be they prime or zoom. First get two objects that are three dimensional that are about a foot tall and half that wide. Or two mannequin heads.  Make sure your objects have obvious markings or protrusions at different distances from the front.

Second, set your subjects about 8 feet apart front to back and nearly side by side left to right as in this little diagram.

Lens Exercise


Now position the camera lens combination so that with the camera in portrait orientation (vertical), you fill the frame with the first head and can see all or part of the second head over the the shoulder of the second head.

Open the lens to its widest aperture and shoot a frame.  Close the lens down to its smallest aperture and shoot a frame.  (This is where that tripod is going to come in handy).  Check your white balance and ISO so the shots don't look like mush.

Repeat for your different lenses.  For zooms, do the two shots at a variety of focal lengths.  For example, if you have a 24-105mm take shots at 24mm, 35mm, 50mm, 75mm and 105mm.  If you have a 70-200mm take shots at 70mm, 100mm, 135mm, 150mm and 200mm.

Import your shots into your editor of choice and make a layout so the wide open shots are in a line from widest focal length to narrowest focal length.  Add a second line of shots to your layout from widest focal length to narrowest focal length at the the small apertures.

Congratulations, you've now created your personal focal length / depth of field guide.  By memorizing the look of the shots you will be able to look at a scene and "see" how it will be through the lens, before you put the lens on and make a frame.  It's a critical piece of becoming a better photographer, learning to "see" like a lens.

The "Right" Lens

This past couple of weeks I've become engaged in a number of conversations about the "right" lens for "subject of query".  Many times I am asked about the best lens for portraits, sometimes landscapes, sometimes sports. There is a lot of misinformation out there, and a lot of varying opinions.  Here are mine.

Landscapes and Scenic Vistas

In this case you often want to show a wider field of view and create a sense of space.  Wide angle and extra wide angle lenses create perspective exageration seemingly increasing the distance between the foreground and the background.  Note, that for this to work, there HAS to be something in the foreground.

Full Frame : 24mm f/2.8, 16-35mm f/2.8, 17-40mm f/4

Crop Sensor : 16mm f/2.8, 11-22mm f/4

Lens speed (large maximum aperture) is less critical

Small Groups, Casual Interaction, Street

The idea is to have the shots look sort of like your eye sees but with a bit more environmental inclusion.

Full Frame : 35mm f/2.8 or faster

Crop Sensor : 24mm f/2.8 or faster

Lens speed becomes more important as you may want to go for shallower depth of field, f/1.4 is optimal

Headshots and Upper Body Portraits

These shots are about making images that are pleasing to the subject and that may be used in a portfolio for a model or an actor.  In these scenarios, shallower depth of field and moderate perspective compression are critical.

Full Frame : 70-200mm f/2.8, 100mm f/2.8 or faster, 135mm f/2.8 or faster, 200mm f/2.8

Crop Sensor : 85mm f/1.8, any of the lenses listed for full frame except the 200/2.8

Lens speed becomes VERY important as you will need to be able to deliver very shallow depth of field.  I've said it before and I'll keep saying it.  The 50mm or Nifty-Fifty IS NOT A PORTRAIT LENS, regardless of what mcmarketing and uninformed retail hypers tries to spin.  Headshots look horrible, and are a great way to make the model hate you.

Full Length Fashion

This one is tough because you need some moderate perspective compression but getting that means having good distance from your subject and being able to maintain shallow depth of field.

Full Frame : 70-200 f/2.8, 85mm f/1.8 or faster, 50mm f/1.8 or faster

Crop Sensor : 35mm f/2.8 or faster, 50mm f/1.8 or faster

Lens speed is very important for depth of field control.  Slower zooms can work but you will need to create more distance between your model and the background if you want shallow depth of field as most of these kit lenses are f/5.6 at 55mm which is not the shallow depth of field you need

General Purpose Telephoto Outdoors

Kind of an all around lens to have, for lots of things.

Full Frame : 70-200mm, 75-300mm

Crop Sensor : 55-250mm, 70-300mm

Lens speed is less important but remember that when the light starts to fall you will need to be pushing the ISO up to keep handholdable shutter speeds

Arena Sports eg Hockey

Here's where the general purpose telephone fits IF it is a fast lens.

Full Frame and Crop Sensor : 70-200mm f/2.8, 1.4x Teleconverter

Lens speed is a killer factor indoors.  A slow lens can work so long as your camera can handle high ISO settings without turning into mush

Field Sports eg Football, Larger Wildlife

Full Frame  : 300mm f/2.8, 400mm f/4, 1.4x Teleconverter, 2x Teleconverter, 100-400mm f/5.6

Crop Sensor : As above, plus 75-300mm f/4

At higher magnification depth of field becomes shallower so your cameras ability to handle higher ISOs without falling apart will define the lens speed mostly, although faster lenses pass more light and so autofocus performance is always better with a faster lens

Birds and Distant Wildlife

This is the realm of go big or don't bother (unless your name is Moose, or Doug or Claude - all of whom are amazing Bird photographers).  The longer and faster the lens the better.  This is also the realm of building a relationship with a lens rental house because unless you qualify as stupefyingly rich, glass in this space costs  like a small car.

Full Frame and Crop Sensor : 100-400mm f/5.6, 400mm f/4, 500mm f/4, 600mm f/4, 800mm f/5.6, 1.4x Teleconverter, 2x Teleconverter

Choose a body that can handle higher ISOs with ease.  The combination of weight and dropping lens speed coupled with the need for higher shutter speeds even when on a tripod or monopod means you will be into the high ISOs and lower grade sensors will enter the mush zone.

Macro Photography

Close up work changes things as all true Macro lenses give the same level of magnification, and the only thing that really differs is the distance between the front element and the subject.  True macro most often means a tripod and very shallow depth of field while focusing so I also recommend a micro-focus rail for this purpose.  Macro lenses start as short as 40mm although I have little use for any macro shorter than 100mm and prefer the longer 180mm personally.  Lens speed is usually in the f/2.8 to f/3.5 range needed for light gathering to make the AF really efficient, although you may find yourself moving to manual focus as you shoot more.

Full Frame and Crop Sensor : 180mm f/3.5, 100mm f/2.8

So that's it.  Your guide to the "Right" lens.  Other folks will have different opinions, and these are mine formed after being a photographer for over three decades.  Doesn't make me "right" but it does offer some perspective.

Tips to Make Better Photos : Shooting Hockey

Shooting sports is not my forte.  I shot soccer and football a million years ago in High School and have been shooting Polo for a couple of seasons.  My friend Susan's son plays in the OJHL for the Aurora Tigers and I went out once last year to provide her some coaching support.  This year was busy but I've been pushing to make time to attend local games.  We're into the Quarter Finals of the OJHL playoffs and the action is great! 1Dx_NmktWhitby_-003020130303-156

What I love about OJHL hockey is that the young players are really committed to the game and are NEVER going through the motions.  I actually prefer this hockey to the NHL, but that's my choice.  I can attend a lot of games at a very fair admittance price, get very close to the ice and shoot like a mad fool without being in the way of the other spectators.  I have the good fortune of being able to attend local team's games as both the Newmarket Hurricanes' and the Aurora Tigers' home ice is reasonably close.

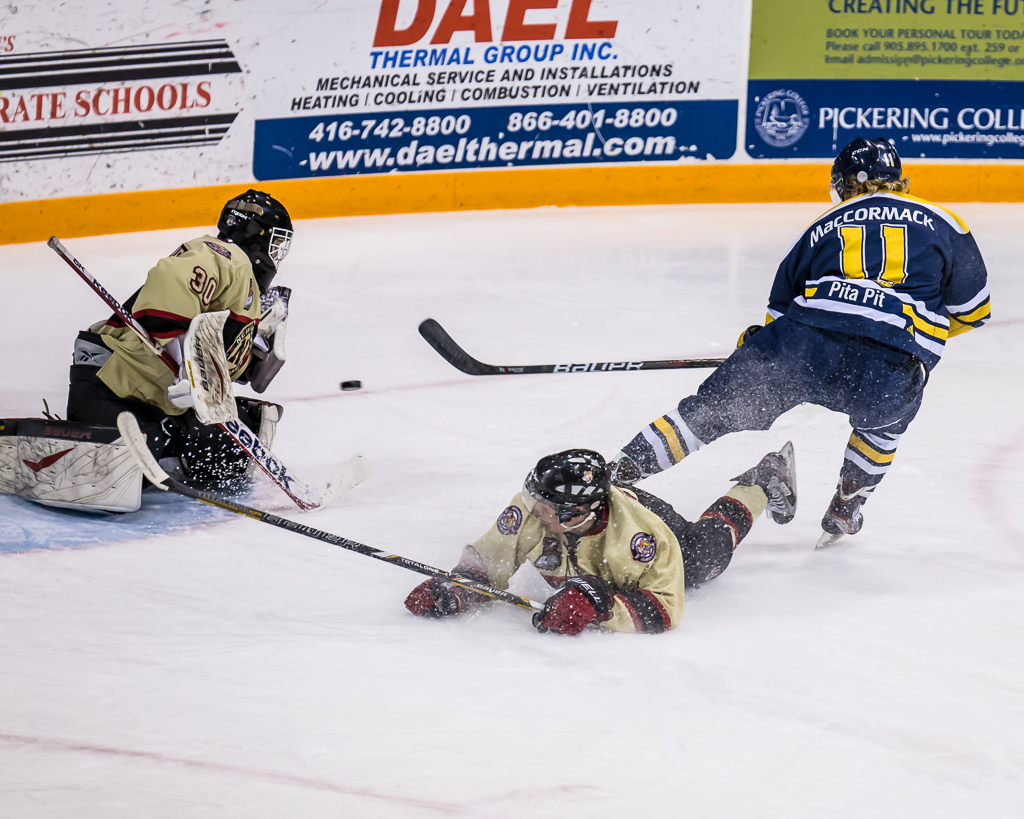
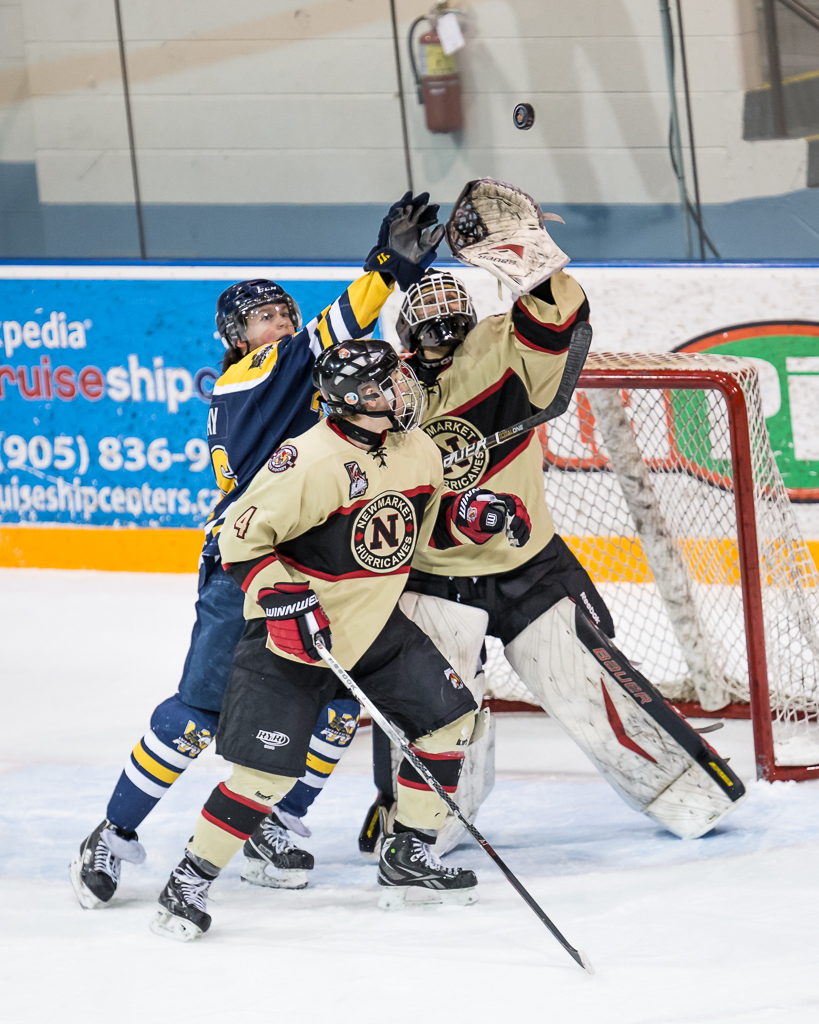
1Dx_NmktWhitby_-003020130303-354These shots are from a recent game between the Newmarket Hurricanes and the Whitby Fury.  I thought it might be interesting to share some of the things I have learned the hard way about shooting hockey.  First, you have to know the game, at least to some extent.  I surely don't know the ins and outs of hockey as well as my wife does, but well enough to set up for shots and to be continuously learning to anticipate where the puck will be, to paraphrase the Great One.

1Dx_NmktWhitby_-003020130303-73

So to get started, one of the first things I learned is that the lighting in Junior hockey arenas is pretty horrible.  It looks ok (mostly) to the eye but is a mess of colour temperature.  In the Ray Twinney Centre in Newmarket, my friend Brian Watts, who shoots hockey professionally, warned me of the "red" corners.  The ice looked fine to me live but once I downloaded the photos the span of white balance was all over the place.  I have tried arriving early to do a custom white balance but that didn't work out well because of the amount of variance so now I shoot AWB and correct in post.  The other thing about the lighting is that it is dimmer than you think it is.  I've shot everywhere between ISO 800 and ISO 2500 and now go in with the ISO set to 2500 and live with slighter reduced tonal range and nominal noise.  This is one place where the low light capability of the 1Dx blows me away.

1Dx_NmktWhitby_-003020130303-79My shooting kit for hockey is as follows;

  • Canon 1Dx in Av, ISO2500 EV, +1 2/3, Focus Tracking in Mode 6, AI Servo, Evaluative Metering
  • Sigma 120-300/2.8 lens either wide open or f/4 and RRS lens plate
  • Gitzo 3551 Carbon Fibre Monopod with RRS MH-02 Head
  • Black Rapid HD Sling Strap

That's pretty much it.  If I want "environmental" images, I put my Leica M9 with Zeiss 35/2 in my coat pocket.  As much as I love the Leica, rangefinders aren't optimal for sports and the high ISO performance need in hockey rinks isn't wonderful.

eos_1dx_03The 1Dx has Canon's new case based focus tracking module and I've tried all the different cases to shoot hockey.  The 5D Mark III has a similar system and I find that Case 6 for subjects that are fast moving and change direction erratically works well for shooting with the long glass.  I get a lot fewer missed shots because the AF is not transitioning in accordance with the game.  In this mode the AF works with me, not against me.  I can now say I understand why pro sports shooters love this camera.  In fairness most all semi-pro and pro level gear has focus tracking of some type built in, but I find the Canon system so fast and so easy to use, I love it.  I set a single focus point and follow the action, using the back focus button (AF-On) to enable the AF in advance so it's locked when I press the shutter.  Obviously I have the AF set to AI Servo mode.  I've tried spot, center weight and evaluative metering patterns and have gone back to evaluative.  It's not perfect but nothing in a hockey rink is neutral grey so my experiment with spot metering linked to the AF point produced a disproportionately high failure rate.

136_120-300mm_osThe Sigma lens is extremely sharp. There are Lightroom profiles for it and I give the Sigma folks credit for their design because the corrections are relatively small, the lens is that good out of the box.  The only downside to the Sigma is that it is big.  I mean really big.  I'm no tiny guy, but if I had to handhold this glass for a full period, I'd need a chiropractor, a sports masseuse and bed rest.  So I go with the Gitzo monopod and the Really Right Stuff MH-02 Monopod head.  This head is AWESOME.  It offers a smooth moving tile mechanism so I can loosen it off and have smooth but not sloppy tilting while panning with my body.  This is a new monopod head for me and I'm looking forward to the coming MH02LRPolo season as it will help a lot.  By mounting a Really Right Stuff plate on the lens foot, I can have the foot in the LR clamp on the monopod and leave the Black Rapid strap with the Really Right Stuff FAB adapter attached at the same time.  Very handy and very secure.


From a shooting perspective, I find arriving early at the arena and surveying potential shooting locations is critical.  Most town arenas have pretty beaten up glass and shooting through it isn't optimal.  You want to be close enough so you aren't cropping out 80% of the shot but also high enough so you aren't shooting partially through the glass.  I can shoot manual but find that Aperture preferred works well for me.  I set the lens at f/2.8 or f/4, depending on the available light and find in most arenas that with an ISO of 2500, I will get shutter speeds above 1/500 of a second.  Yes the lens has optical stabilization and yes I am using a monopod but that doesn't change the fact that hockey moves FAST.  In the sample pictures, I am able to mostly freeze the players yet in most cases, the puck is still blurred.  I like this as it conveys the sense of action.  You'll also note that by default I dial in +1 2/3 stops of exposure compensation to keep the whites from going grey.  I tried just dialing in +2 but I kept running into situations at certain points on the rink where the shot just blows right out.   I can add the 1/3 stop in post processing but if the important stuff gets blown out completely, there's no bringing it back.

Hockey is a blast to shoot.  I'm starting to wonder what sport I will shoot when the season is over other than Polo.  Junior hockey is a professional league and the OJHL is very supportive of photographers (no selling of images is the major rule).  Many other sports leagues are very protective of photographic rights or are against photography at all where youngsters are playing.  If your child is playing, it may be easier for you.

I'm hopeful that both my local teams go all the way.  They have a wonderful rivalry and it would mean plenty of games for me to shoot before season's end.  Many of the players I have photographed this year are going away to school on hockey scholarships next year, so we'll see a new group of players in the 2013-2014 season.  If you want to learn to shoot hockey, your local teams are a great place to go shoot and you'll be supporting your local community.

1Dx_NmktWhitby_-003020130303-272


Tips to Make Better Images : Taking or Making

I admit to being a bit pedantic about this, but there is a substantial difference between taking a picture and making a photograph.  Thats not to say that there is anything wrong with taking pictures but the real joy and differentiation comes when you make a photograph. Youre driving along and see something that grabs your eye.  You pull over and take a few shots with your smartphone and get back to the driving.  Youre sitting at home and the cat does something amusing.  You grab the camera and snap some shots before it bores of you and ambles off to sleep.  Your child comes out of her bedroom with a sleepy face, mussed hair, thumb in mouth and shes just so cute you hit the burst mode to capture this moment in time.  These are all great pictures, fun to share with family, friends and social networks if you go that way.

At another time you decide to make a photograph of a friend.  Before you shoot, you mentally visualize the final image.  You think about light and shadow.  You consider the dimensionality of the image.  You think about the background, and make a decision to throw it out of focus by using shallow depth of field, and check to make sure that it wont create distractions.  You meter carefully to position yourself to maximize soft light and reduce contrast in your friends face.  You make sure that there wont be anything growing out of her head.  You look for wrinkles in the clothing, you have her press her chin forward to streamline her neck and you make sure that her eyes arent buried in shadow.  You tighten up your composition to fill the frame and place her face into a pleasing arrangement.  You decide that a bit of fill flash will help fill shadows under the eyebrows and under the chin, so you add your flash and diffuser and watch that they dont create shadows in opposition to the existing light.  As you press the shutter you watch for an expression that creates a framework for the viewer to create his or her own story.

If the last scenario sounds like a lot more work than the first three, you are correct.  Its the difference between making a photograph and taking pictures.  Both are valuable, both have reason to exist but its the last one that will help you grow as a photographer.  Im not ever going to advocate a 365 anything as I find them to go mechanical very quickly.  What I do encourage you to do is to challenge yourself to make photographs regularly.  Every photograph doesnt have to be museum grade, every photograph does not need to be a saleable item.  While many of our mentors derive all their income from photography, many of us do this for the fun and joy of having and investing in a creative pursuit.  The only viewer you have to please is you, and if part of that pleasure is learning what does and does not work, youre winning.

Tips to Make Better Images : The Roll Film Exercise

1Dx_1010-002120130130-3.jpg

I was recently a guest with friends on their weekly webcast called Daytripper Webtalk.

The primary subject was the value of structured photographic exercises.  We all tried the 10 x10, basically 20 images within the same 10 foot square space, although I messed up thinking it was a 10 inch square space.  Simple gear, no post processing.  Darren and Bryan really focused on seeing everyday things differently, Gabriel took a childs eye view and I tried for a theme of like pairs.

In my case I limited myself to the camera, 100mm lens, on camera flash and a plain black background.  As part of my constructed theme my right hand or portion thereof had to be in each frame.  I tried to find like pairs of things to put in the sequence such as pencil and pen, memory card and film box and fork and spoon.  Coming up with ten pair of like items, shooting them and pushing them out as JPEGs in the span of an hour was a bit challenging.  I found the images I created to be contrived and there was really nothing there I will keep or print, although I did get some ideas for things to do as individual stills.  The real issue I have is that a photograph should set the stage for the viewer to create a story around it, and the slideshow motif really took away from that although a couple of the individual images could be a starting point for more serious work.

The primary outcome of the assignment was to determine if fixed exercises can be beneficial.  We all concluded that they do, if they help you get your head outside of the box.  Each host plus me as guest offered up suggested exercises.  Mine is as follows;

Pick a location and a time.  Limit yourself to a timeslot to capture images.  Now you go to the location and may click the shutter twelve times for twelve images.  No more no less.  Get it right in the camera, because while you will have post processing available, the goal is not to do exposure, white balance, or serious cropping in post.  When I was starting out and shooting roll film this was a very popular exercise to force the photographer to look for and see the images because we could only get 12 shots on a roll of 120 film, although those shooting 645 could get fifteen.  Working with a twin lens reflex at the time, the square format was also a different way of composing that I really enjoyed.

The roll film exercise is a good one.  It creates constraints in multiple vectors and really does help you see

Model Releases, Copyright and Where to Learn More

Last week, the Canadian government changed the Copyright Act to ensure that the copyright to work produced by a photographer is the same as for any other artist.  Simply, you retain your copyright whether you do the work for yourself or are commissioned to do so.  In the past, being prior to November 7, 2012, commissioned work became the property of the commissioning agency unless specifically excluded by contract.  Well done Canada! I regularly listen to Frederick van Johnson who hosts the This Week in Photo podcast.  Like any podcast, some episodes are more interesting than others depending upon what you are looking for.  A recent episode featured Mr. Jack Reznicki and Mr. Ed Greenberg of TheCopyrightZone.com and their critical book, The Photographer's Survival Manual.  (Link to purchase this book at the bottom of the post)

Even though I own the book and recommend it to students, repetition is the mother of skill and so I learn something whenever I listen to these gentlemen.  What was my learning this time?

Electronic model releases may not stand up in court because electronic documents can be edited.

I have looked at, and purchased, electronic model release systems for the iPad, and liked the one from the American Society of Media Photographers very much.  (Others left me underwhelmed).  Until Mr. Reznicki and Mr. Greenberg did their little role play, I missed completely how an electronic release could be challenged in court.  Paper is the way to go.  Listen to the episode of TWIP here.

Support The Photo Video Guy by purchasing the book from Amazon through this link.

[iframe][/iframe]

VIDEO : Introducing Canon's Radio Remote Flash System

I've just made available this new video that introduces Canon's 600 EX-RT flash and ST-E3-RT flash controller. The new radio system is a significant departure so I explain the infrared history of Canon remote flash, where the new system is compatible and where it is not, and offer a comparison to the well known Pocket Wizard radio controllers for eTTL flash. [iframe][/iframe]

VIDEO : Introduction to Macro Photography

Orchid-Canon-180-Macro.jpg

In this video, I introduce viewers to macro photography, discussing concepts, equipment, lighting, exposure techniques and supplemental tips.  I close with some ideas to encourage viewers to make macro photographs quickly and with plenty of learning opportunities. [iframe]<iframe width="640" height="360" src="http://www.youtube.com/embed/2fyHsoHbHlA?rel=0" frameborder="0" allowfullscreen></iframe>[/iframe]

VIDEO : Introduction to Night Photography

I recently prepared a class to help people get started on Night Photography.  Response was very positive so I am including it here for anyone to watch.  


I would also like to recommend Lance Keimig's book as a terrific resource for Night Photographers.  You can support the site by buying it through the Amazon link here.


Light It Magazine Issues 2 and 3 now available

Great news!  There are now more issues of the awesome Light It magazine for the iPad now available with Issue 4 to follow by year end.  For those who got excited by the superb first issue and then wondered what happened, there was a delay in getting the app approved by Apple, but that's all done now and the issues are available.  At $2.99 an issue, I'm not sure there is a better and more beautifully constructed way to learn about lighting.

If you don't have the app, go get it.  If you don't have an iPad, now you have a great reason to get one and to call it "education expense".