

EXERCISE : Learn to "See" Like Your Lens
/This is a pretty simple exercise that you can do with your lenses be they prime or zoom. First get two objects that are three dimensional that are about a foot tall and half that wide. Or two mannequin heads. Make sure your objects have obvious markings or protrusions at different distances from the front.
Second, set your subjects about 8 feet apart front to back and nearly side by side left to right as in this little diagram.
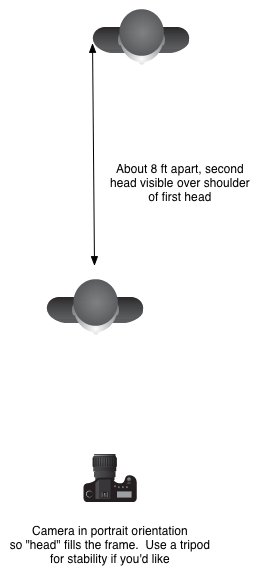
Now position the camera lens combination so that with the camera in portrait orientation (vertical), you fill the frame with the first head and can see all or part of the second head over the the shoulder of the second head.
Open the lens to its widest aperture and shoot a frame. Close the lens down to its smallest aperture and shoot a frame. (This is where that tripod is going to come in handy). Check your white balance and ISO so the shots don't look like mush.
Repeat for your different lenses. For zooms, do the two shots at a variety of focal lengths. For example, if you have a 24-105mm take shots at 24mm, 35mm, 50mm, 75mm and 105mm. If you have a 70-200mm take shots at 70mm, 100mm, 135mm, 150mm and 200mm.
Import your shots into your editor of choice and make a layout so the wide open shots are in a line from widest focal length to narrowest focal length. Add a second line of shots to your layout from widest focal length to narrowest focal length at the the small apertures.
Congratulations, you've now created your personal focal length / depth of field guide. By memorizing the look of the shots you will be able to look at a scene and "see" how it will be through the lens, before you put the lens on and make a frame. It's a critical piece of becoming a better photographer, learning to "see" like a lens.


