

Lighting for Headshots : A Repeatable Setup That Works Anywhere
/
Headshot with mannequin Darla, lit using this setup but with the fill light turned up for a more high key effect. Also, I neglected to brush her hair. Yes she is creepy looking. Everyone says so
Headshots are not portraits. The purpose of a great headshot is to call attention to the person and to portray them in such a way that they stand out and show who they are. The great Peter Hurley says this is 90% psychology so I'm going to leave that part up to you.
What you will get in this tutorial is a simple, repeatable, three light setup that you can use anywhere with only a little set up time once you have your configuration recorded and that will deliver superb and consistent results. If you have a conga line of shots to make, the set up doesn't change, and so you can focus on the human skills necessary to bring out the real person.
This is critical because the way to make a normal human go weird is to put a camera in front of them. Hurley is right on the money on this point.
As I said, this is a three light setup. The first light, that we will call the key light, is the one providing the main illumination on the face. It is set up directly facing the subject, up above the head and angled down. The second light, that we call the fill light is in front of the subject facing the person and placed below the sternum and is angled up. It's purpose is to fill in the shadow areas created by the key light, but not equally. Shadows create dimension, you just don't want them to be harsh. Properly positioned, you will have two catchlights in each eye, one on the upper crescent of the iris and the other in the lower crescent of the iris. The third light is behind the subject, that we call the backlight and is facing the camera. It is positioned so it angles upwards a bit so as not to produce flare in the lens.
For my illustrative images, I am using my mannequin Darla in the headshot example and in the behind the scenes images. I cannot over emphasize the value of a mannequin or mannequin head for experimenting with and learning lighting. As you will note, Darla reflects a bit differently from human skin and has creepy alien eyes. Don't get caught up in those things.
You will hear a great deal about setting ratios and falloff and subject to light distance. This system works because you will know by looking when it's working and when it's not. You will also have your lights as close as you can while keeping them out of the frame in order to maximize their surface area and thus their softness.
To make a source "softer" bring it closer to the subject being lit.
The keylight, is ideally shaped by a beauty dish. I prefer white interiors to silver, and would rather work without a sock or diffuser on the front if the subject's face allows for it. The bigger the dish the better. Beauty dishes exist to sculpt cheekbones and so are a bit punchy. If your subject has a lot of character in the face, you can use a front diffuser to draw down the punch a bit. While a grid is really nice for Hollywood or Film Noire looks, it is not needed for headshots. In the absence of a beauty dish, a small to medium umbrella positioned to reflect light off a white interior can work effectively.
Why white? White is less reflective than silver and when used close in is less punchy and produces a creamier light. This isn't subjective it's science.
The fill light is shaped with a softbox. I prefer something in the range of a 2' by 3' softbox, although you can get away with a 1' x 4' strip if that's what you have available. Many folks will suggest that you only need a reflector. You can get by with one, but you sacrifice a lot of power control and spill control that way. A softbox provides more control and provides a very nice offset to the key.
Managing spill is very important in any constructed image. Reflectors have no spill control, unless you have a voice activated reflector holder who can fold it into a Pringles shape, hold it and aim it for the duration of your shoot. Or you could get a softbox.
The back light is also shaped with a softbox. The softbox needs to be large enough to completely fill the frame behind the subject with nothing else visible. I find that a 2' x 3' softbox works well here too. This light is used to produce a completely white background and to push a little bit of spill around the head and over the shoulder edges to limn the subject and soften any harsh edges.
The back light is why this system works anywhere. You don't need to carry a roll of paper, or a popup background or to hunt for one that's pretty. This is a headshot and the background should be completely boring. White is easy, black is hard and needs more kit and more space and grey, well grey just looks drab and unappealing.
The three lights together make a triangular box that the subject's head fits into. While you might at first glimpse, think that this lighting will be flat and boring, it isn't.
The sources for each light are going to be flash. Continuous light is just not strong enough to be practical or to freeze micro movements without using a higher ISO. A headshot should be sharp and flattering, not noisy. You are also going to check your white balance early. AWB may work but may not. If your subject has very thin skin or is very pale, try setting the White Balance to Cloudy right up front. Refrain from vocalizing that the subject has pale or thin skin. Keep your yap shut, just make the changes.
You can use speedlights, studio strobes or a combination in your set up. In my set up, I use Profoto strobes. The key is a 1000ws D2 mounted on a C stand complete with a MOLA beauty dish. The fill is a 250ws B2 mounted on a short stand with a Profoto 2' x 3' softbox. The backlight is another 250ws B2 on a regular stand mounted with a Profoto 2' x 3' softbox. You do not need to use the same lights that I do. You can make these headshots with three very basic manual mode speedlights. You do not need to become lighting bankrupt for this to work.
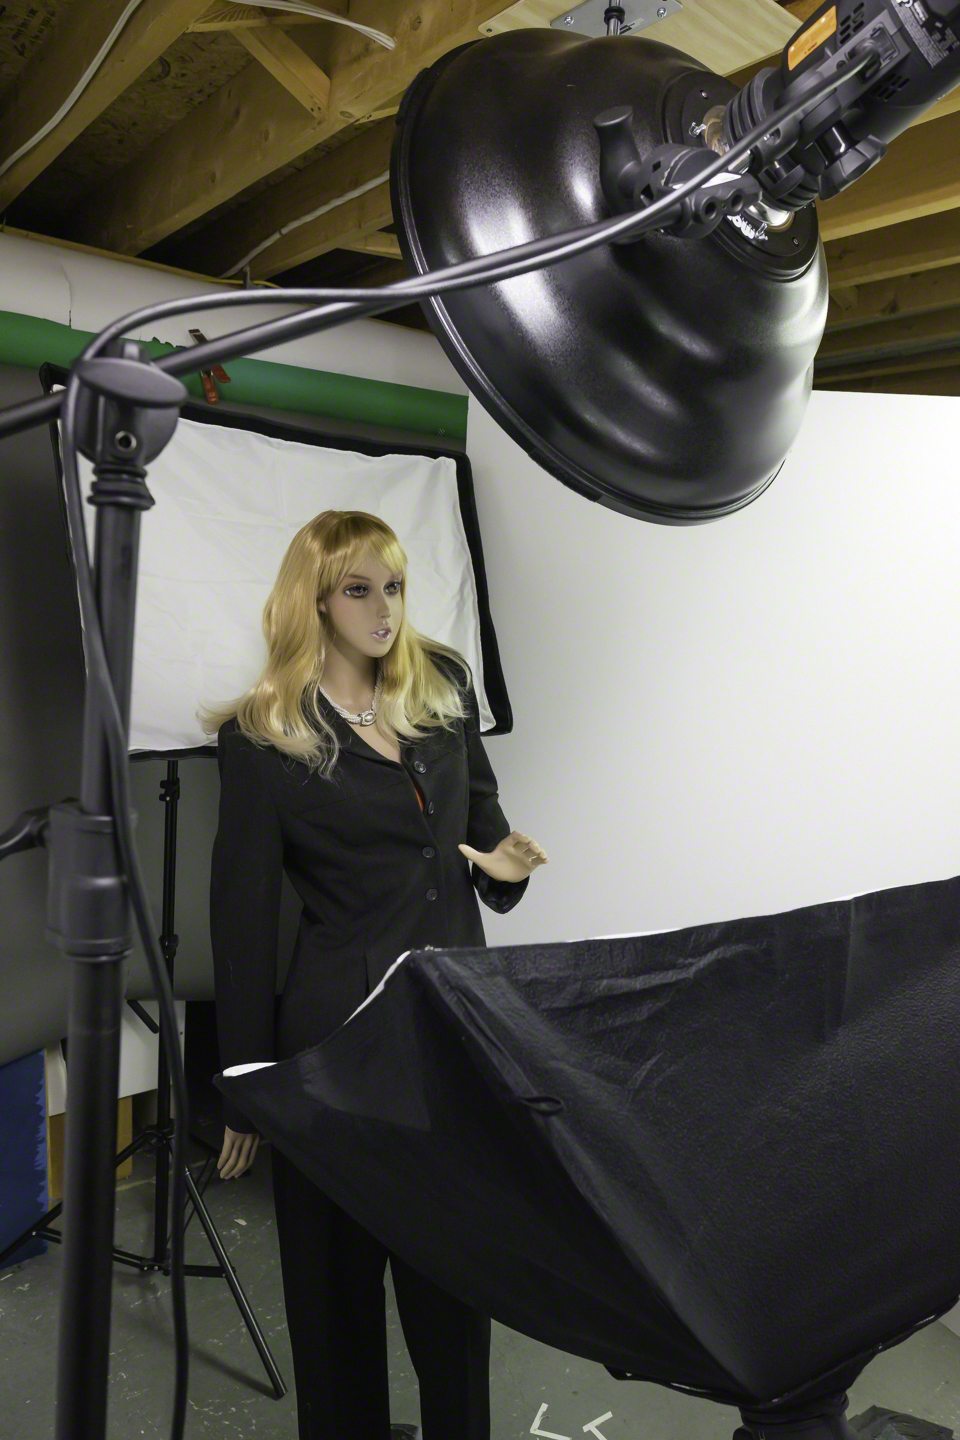
Again, I will tell the story from the perspective of my working setup. I place the C stand base and riser off to the front and side of the subject, just off the shoulder line and about 2 feet in front. I then sandbag the stand so the bag weight is on the stand base with none of the bag touching the floor. I want all the weight on the stand. Mounted to the riser is an extension arm with a knuckle and stud. The D2 gets attached to the stud, and the MOLA is attached to the D2. I position the front of the flash just so it is flush with the inside of the beauty dish bowl. I have changed the standard reflector in my MOLAs to what is called an Opal. It reflects most of the light coming from the strobe back into the scalloped bowl but allows a bit to pass through directly. A regular beauty dish with white reflector will work just fine, I personally prefer the light from the MOLA.. I adjust the MOLA so it is above the subject's head and about 18" in front, aiming downward. I use the modelling light feature in the Profoto D2 to check my positioning, but you can do the same thing by eye from behind the subject. Lighting is a game of inches so be picky in your set up. I set the Profoto to manual mode and the lowest power setting when building a new set up.

From camera right, you can see the MOLA beauty dish up top, the fill softbox lower left pointed upwards and the back light softbox behind Darla's head. A wide angle lens was used for these shots because of space and the images suggest that the soft boxes are not square to Darla. They are, it's just perspective exagerration that comes with a wide angle used in close.
If you are using a speedlight, with either a speedlight beauty dish or an umbrella, a Manfrotto 420B stand kit with boom and sandbag can be a less costly and less heavy alternative to a C Stand Complete. I like the Manfrotto very much for speed lights, but always go with C Stands when using strobes on booms.
For the fill light, I mount the B2 to a short light stand. This is an important piece of kit because a regular stand with everything mounted will probably be too tall. I sandbag this stand, even though it is low to the ground and pretty stable. The softbox Is mounted to the B2, again with the front of the flash just inside the back of the softbox. I use both an internal and an external diffuser in this softbox. I then place it directly under the MOLA and angle it up towards the subject trying to mirror the upward angle of the softbox to the downward angle of the beauty dish. I then raise the stand height to the point where the softbox edge that is on the camera side is just out of the frame. I typically orient the rectangle of the softbox horizontally. For the first time build, I set the B2 to manual mode and to the lowest power setting. Again, you can use a speedlight in manual mode for your fill light.
From camera left, this angle gives a clearer view of the positioning of the fill and back light soft boxes. You see particularly that the back light is nearly touching Darla's shoulders. The white panel to the right in this image and to the left in the prior image are v-flats. I use them to simulate the effect of white walls in a small shooting space and to prevent inappropriate reflections from the shelves in the studio.
The back light gets mounted to a regular light stand. I use Manfrotto stacker stands because I like them, but any stand will do so long as it does not flex with your light and softbox mounted. I sandbag this stand as well, just as I did the others. To the stand stud, I mount another Profoto B2 and to it I attach another 2' x 3' softbox with the flash positioned in the same way as the fill. I set the softbox orientation depending on whether I will be shooting the headshot in landscape or portrait orientation to match the viewfinder framing. I do this to ensure that nothing other than the softbox front diffuser appears in the background of the viewfinder frame. As with the fill light, I use both internal and external diffusers on the softbox. I position the softbox so it fills the frame behind the subject and aim it slightly upward so it is not firing directly into the lens. This helps improve contrast and significantly reduces the likelihood of lens flare. For the first time build, I set the B2 to manual mode and to the lowest power setting.

Behind the shoulder view of the positioning of the key and fill lights. The giant Broncolor Para in the background was out for a different project and was not used in the preparation of this article.
If you are using other lights, the key idea here is to start with them on manual and at the lowest power setting for your first time build. Once you have the configuration that you like and the set up dimensions and positions documented, you can start with your recorded settings.
While it is possible to connect the key light to the camera via sync cable and to set the other two lights as true slaves, my preference is to use radio controls that allow me to control the power output of each light from the camera position. Profoto strobes can do this with their Air controller as can most all high quality strobes. If you are using speedlights, I have had excellent success using Phottix ODIN or Godox radio transmitters and receivers, but you can use anything that you like that can control the flashes from the camera position and that can support a minimum of three groups. Group support is a requirement for radio controls, not an option. I would counsel buyers to avoid kit that comes direct from overseas with no local retailer involved. Without mentioning specific brands, years of experience with student's frustrations tells me that this cheap stuff does not actually save anyone money in the long term.
The concept of a group is to isolate a light or number of lights from others. This allows you to control one group independently of others and is a hallmark of successful lighting management. For this setup, I place the key light in Group A, the fill light in Group B and the back light in Group C. The radio system allows me to control the output of each group independently, to enable or disable the modelling lights independently, and also to turn groups on or off as I wish.
You do not want the ambient light to contribute anything to the exposure, so try to darken the location that you are working in a bit. Set your camera shutter speed to 1/160. Your camera maximum native sync speed may be higher, but I have learned that some radio systems create delays in communications. I have not experienced this issue with Profoto, Canon radio, Nikon radio or Phottix systems, but this setting is safe. Set your ISO to your camera's lowest native ISO, usually ISO 100, but sometimes ISO 200. By now, you have figured out that your camera is in Manual mode. Nothing to be scared of, we simply want complete exposure consistency from shot to shot.
Now you need to pick the lens. If you are shooting a micro 4/3s camera, I would suggest nothing shorter than a 45mm. If you are shooting an APS-C camera, I would suggest nothing shorter than an 85mm. If you are shooting full frame, I would suggest either a 135mm fast prime or do what most pros do and go with a 70-200 zoom. You can certainly use the same lens on an APS-C sensor if you have one, and if you have M43, something on the order of a 40-150 will work. I personally prefer fast lenses because the depth of field wide open is shallower and there is less leniency afforded to the autofocus system.
Once you have the lens mounted properly, if you had not done so, select an aperture that will deliver just enough depth of field. If I am shooting on a full frame at 200mm, I try to start at f/11 but will drop to f/8 if using a shorter focal length. I want to be able to focus on the pupil of the closest eye, and have enough depth of field so the range from the tip of the nose to the front of the ear lobe is in focus.
With the flashes not active, make an exposure. If all is well, the frame will be black, meaning that the ambient light is having no effect on the image and that is precisely what you want. If there is an impact, you may need to close down the aperture by a stop, or better still to try to darken the shoot location a bit more.
Activate Group A and take a test shot. Depending on the power of your flash the image may be great, too bright or too dark. If perfect, excellent. If too dark, increase the power one stop and shoot again. Keep doing this until your test shot is too bright, then back off in 1/3 stop increments until you are happy. If you started too bright, you have a different problem because it means that even at the lowest output level your light is too strong. If so move the beauty dish six inches back, re-aim and shoot again. This will not be likely if you are using speed lights or mid powered strobes, but I found that the Profoto D2 into the MOLA was too hot in the original position. A six inch shift brought it right where I needed it to be. Make a note of the light stand position on the floor relative to the subject and note the power level. You are building a completely reproducible set up and that's why you are writing things down. You can snap a picture on your cellphone as a reminder, but knowing the real distances is very important for fast and repeatable set up.
Turn off Group A and turn on Group B. Take a test shot. It will likely be too dark, so raise the power one stop and test again. Stop when you get decent lighting on the underside of the chin and nose that looks about a stop underexposed. Adjust this to taste bases on your subject. Even try different ratios for different looks. If your subject looks ghoulish like a Hallowe'en monster, you went too far. Better to be under than over. Once you have it looking the way you like, write down the settings and distances.
Turn off Group B and turn on Group C. Take a test shot. Raise the power until the background is completely white and you are starting to see a bit of haloing on the edges of your subject. The subject should mostly be silhouetted but because you have a reflective beauty dish and reflective softbox in front, you will get some reflection back into the face. If you can clearly see facial details, your back light is probably set to too high a power level. Once good, make notes.
Turn on all three groups. Take a test shot. This should look pretty awesome from a lighting perspective. You can now tweak your power levels to deal with skin tone and hair colour as needed, working in 1/10 stop increments on strobes, and 1/3 stop increments on speedlights, without leaving the camera position when using good radios.
As you shoot more and more headshots, your notes will grow and you will know what tweaks to put in for fair or dark skin, for blonde, black or no hair. You will always be able to start with your note settings from your first set up, so long as the distances are the same. You will also be able to make successful headshots in a space as small as 8' x 8' with a normal 8' ceiling.
This is, in my perspective, the easy part. The harder and more valuable part is what you do to engage with your subject to bring them into comfort and to capture who they are. This is a skill that you develop over time and with practice, so don't be hard on yourself.
I will move on to some posing tips. Headshots are face forward looking into the camera, not some artsy thing. The head can be at a slight angle vertically and/or horizontally but both eyes must be visible and have face showing past the outside edges. Headshots are powerful not airy. Have your subject blade their body to the camera, by sitting or standing at an angle and bringing their head around. Have them push their forehead towards you without tucking the chin too much. This narrows the neck and pulls on jowls and neck wrinkles. If they have good teeth, it's ok to show them, but if they don't, encourage subtle smiles. It is NEVER ok to have hands near the face in a headshot. The face is the story and working with hands is an entirely different and very difficult scenario, since most people worry considerably less about taking care of their hands relative to their faces.
When you get a shot that you really like, show your subject quickly and get back to work. Keep up a constant stream of positive chat. If something goes wrong, don't say anything or grumble, just keep moving. Your subject's confidence in themselves is usually low, and their confidence in you will drop if you are fumbling about. That lack of confidence in you will show in the headshot. That's why preparation matters so much. You want the process to be painless, fun and fast.
While I address this subject in different articles, you must NEVER EVER explain to a client what you will do or have done in post to help them look great. If you tell the person all the things you do to make them look amazing, they are highly likely to become very depressed and not want their headshot. Always be respectful but it’s ok to say that you want to use a bit of powder because the light is making their skin shine a bit (it's the light's fault) or that you would like to see a bit more mascara to really make their beautiful eyes pop. If your subject normally wears glasses and you are getting big reflections, this can be a problem and you will want to allocate more time to the shoot to counter this. The easiest way to handle reflections is to ask the subject to raise the arms of the glasses off their ears a bit. The arm angle will be hidden in a face forward shot and by playing with the angle of the lens, you can usually counter eyeglass reflections in a few tests. If you cannot, at least get one eye clear and plan for significant time in Photoshop for the correction. Do everything possible to get things right in camera.
I mentioned white balance at the beginning of the article. Sometimes you will need more than a white balance adjustment. I carry a set of CTO gels with me on location or have them in the studio. I like to add a 1/4 or 1/2 CTO to warm a subject up if their natural look is a bit cool. I don't recommend doing this with makeup and I would suggest being very honest with anyone who uses spray tan. There is something in the chemistry of fake tan stuff that makes it glow orange under flash. No one looks good in dayglo orange, so suggest laying off for a couple of days before the shoot. If your subject has dark skin, you may need to choose the flash white balance which tends to be a bit bluer than daylight in some cameras. For some of these folks, the wrong white balance will make them look jaundiced. I know, as you do, that as you are shooting in RAW, the white balance in camera doesn't matter to the image but it matters a lot if you are going to let them see the LCD JPEG or the computer screen if you are shooting tethered. If your subject has very dark, almost blue-black skin, you may even need to push the colour temperature blue a bit. If the white balance tends to go towards yellow (as it will in AWB in this case), you will be imparting a horrible greenish tinge to the person's skin. It's your responsibility to make the subject feel and look great so don't cut corners.
The more that you do in camera to get things right, the better off the final product will be. "I can fix it in Photoshop" is not a statement of competence, it is a statement of sloppiness.
Since I've left the track of lighting the headshot to some extent, I will make the case to tether when shooting headshots. Looking at your LCD is guessing and is based on the in-camera JPEG. You are in a far better position to shoot tethered and position the computer display so you as the shooter can see it in proper light and at the right angle. The larger and sharper display can save you time and trouble and can even help you avoid a reshoot. If your camera does not support shooting tethered, well then I am sorry but it's the wrong camera for headshots and portraits.
Getting your gear and basic set up configuration will take a bit of time. Don't do this on a paid gig. Do it at home or other location and write everything down. When you are on site, you want the set up to go fast and look fast and smooth. This creates confidence in people watching you and is very important to your brand. If you rent studio space for your headshot projects, having your plan makes it really simple to get set up and to get the shooting done, minimizing your rental costs. Some studios include their own gear in the rental cost. This can be a great deal when you don't have your own gear and you also won't have to cart your own gear around with you. Just remember that unless you have a lot of experience with the kit in the studio, it's a lot like getting a rental car you've never seen before and being dumped in downtown Manhattan. A client will know that you're scrambling and the shoot will go badly.
Ok. Now you know how to build a repeatable and beautiful lighting set up for headshots. You also have the basics on tuning and posing at hand. It's time for the real work, learning and practicing your interaction with people so you can pull their best out of them. That's the real skill in headshot photography.
Have an idea for an article or tutorial? Do you have a question photo or video unrelated to this article? Send me an email directly at ross@thephotovideoguy.ca or post in the comments.
If you're in Canada, please consider shopping with Henry's in your local store or at www.henrys.com If you're in the United States and shop with B&H Photo Video, please consider doing so through the link on thephotovideoguy.ca as this helps support my efforts and has no negative impact whatsoever on your shopping experience. The product images in this article are hyperlinked to B&H for your convenience.
If you find the podcast or articles of value, consider clicking the Donation tab in the sidebar of the website and buy me a coffee. Your donation goes to help me keep things going. Email your questions on any photo or video topic and I will try to respond within a day.
I'm Ross Chevalier, thanks for reading, and until next time, peace.


