

Ross' Guide to Simple Flash Portraits
/Over the years that I’ve been a photographer and a teacher, I’ve been continually annoyed by the tendency of some people to try to turn simple flash photography into some kind of black art. In the days of film, flash was more difficult requiring sophisticated metering and preparation, polariods and lots of correction.
Those days are past. Our digital single lens reflex and digital single lens mirrorless cameras make great flash images pretty simple. And, while I believe that every serious photographer needs to have and use a handheld light meter, what I will teach you here DOES NOT require you to have a sophisticated light meter.
For starters...
You’ll need a camera that can be set to manual exposure mode. You’ll need a lens suitable for your subject. Since most photographers would like to make better images of people, that’s the route this article will be oriented to. You’ll also need a shoe mount flash that has a manual mode, and the ability to control its power output in manual. At the core, that’s it but since you want better flash control, there’s a gear list coming up. Before we get there, let’s talk about flashes. Oh and don't worry, I have a gear listing at the end for you.
Your camera probably has some variant of through the lens flash exposure control. This is a wonderful feature and can be really helpful, and we won’t be using it in this session. TTL flash is not the end, it’s a starting point on it’s best day because it can be fooled like any reflected light meter. So for simplicity sake, we aren’t going to use it.
Your camera might also have some type of sophisticated remote flash control magic built in. Nikon calls this the Creative Lighting System, Canon has one as do other vendors as well. They can be awesome. They can also be a major pain in the butt because they are line of sight, are dependent on infrared control and often fail when it’s most inconvenient. So we won’t be using that either.
Your camera may or may not have a PC sync port. Your flash, if you already own one, may or may not have a PC sync port. Whether they do or don’t won’t matter because cables are a pain and we won’t be using them.
Before we get to the rest of the kit...
You need to know how to make some settings on your camera, so before we go further, let’s make sure you can make these settings. First, put your camera in Manual mode. This is often a dial or menu setting highlighted by a big capital M. M means Manual. This is a very good thing. Next, you want to set your shutter speed to 1/125 of a second. You do this be setting your shutter speed with dial, wheel, menu or however your camera does this. Remember we are in manual mode so this is a simple manual setting. Next set the aperture on the lens you are using to f/5.6 via whatever method your camera uses. Last of all, set your ISO to your camera’s native ISO, which is the lowest ISO that you can set manually without having to go into a Low mode. For most Nikons, this is ISO 200, for most Canons it is ISO 100. If you don’t know or cannot tell or your camera doesn’t matter, pick ISO 200. Set that via whatever means your camera uses. Ok, that’s it. Settings are basically done. Time to move on to the rest of the kit.
The Flash
Not Barry Allen in this case, we mean the flash you will use on your camera. Your camera might have a built in pop up flash. Fortunately you won’t be using it, since its only real claim to fame is that it makes your photos look like crap. I mean the flash that slides into the hot shoe of your camera. If your camera does not have a hot shoe, best to stop reading now since you have a much bigger issue facing you. If you already have a flash, make sure it can be set to work in manual mode and that you can control the output power of the flash. By this I mean that you can set the output to full, 1/2th, 1/4th, 1/8th power etc. Ideally it would go as low as 1/64th power but that’s not critical. 1/16th power is the least you should accept. The head on your flash should bounce and swivel, but if it doesn’t, you’ll still be able to use the flash.
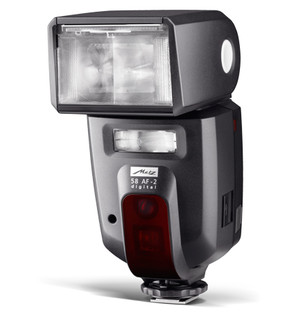 Flash is a lot like a race car. In a race car, horsepower matters. In a flash maximum output matters. Fortunately there is a standard by which you can compare different flashes. This is called Guide Number. You probably don’t care how it’s calculated, you just want to know the Guide Number (GN) in either meters or feet for the flash. I promise that there will be NO math. Just remember that a higher guide number is ALWAYS better. If you do not have a flash, go buy yourself a Metz 58 AF-2 for your camera type. This flash is available to fit all major brands of camera, will integrate with the TTL flash capability of your camera for when you want to use TTL, has full manual power control capability and has LOTS of power. Not surprisingly, it’s guide number is 58 in meters. Canon’s 580EX II has a guide number of 58 in meters. Nikon’s SB-910 has a guide number of 34 in meters. The SB-910 has less power but still works well but I will suggest not going lower in output than a guide number of about 28 in meters such as found in Nikon’s SB-700. Metz also has a model 50, a model 52 and a model 44 all with guide numbers matching their model designation. Remember what I said first. Power matters. Buy the most powerful hot shoe mount flash you can afford. There are now some clone flashes coming out of China that are very inexpensive like the Yong Nuo. I’ve heard good things but since I’ve personally never used one, I won’t offer a recommendation.
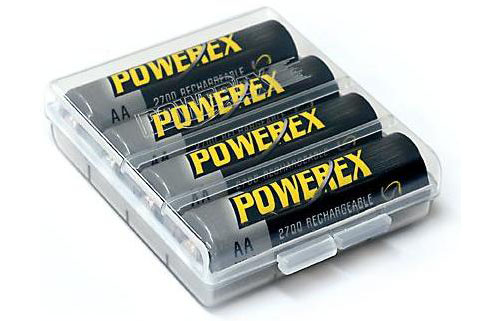 Now go get yourself some rechargeable batteries with the highest milliampere hour rating possible. You will readily find a variety of power ratings. 2100mAh is the minimum to buy. I personally recommend the Powerex batteries from Japan that are rated at 2700mAh. They are available in retail stores and online.
The Rest of the Kit
Bounce flashes can be bounced off of ceilings, or use bounce cards or reflector cards and any manner of Rube Goldbergian strap-on, tape-up, sticky mechanisms to diffuse the very small flash source into a larger source of light. You can also put a diffuser dome on your flash head. Whatever. For this exercise we are going to bypass all this stuff and go right to a Soft Box.
What is a soft box? A soft box is a relatively simple construct. It is a device built to form a consistent shape, square, rectangle, octagon, that usually has a dark fabric exterior and that is lined with either a silver foil or highly reflective white surface. Then a shoot through scrim velcros to the front edges to further diffuse the light. Diffusers do not soften light, they spread it around. Larger sources are softer than smaller sources at a given distance in general. When the flash goes off, the light bounces around inside the softbox and comes out as a much larger area of light. Moving the source closer to the subject makes the light wrap more, and therefore looks “softer”. That’s it. The trade off with soft boxes is really size and portability. A giant box placed close is super soft but needs more power to light and is a transport pain. A small softbox is easy to transport but may not be that soft. Here’s a general guideline. Anything smaller than 20” x 20” is not optimal for people, and anything bigger than 30” x 30” will need multiple heads or studio flash to get good light.
The softbox needs a way to be placed so you don’t have to have an assistant to hold it, it needs a way to attach the flash and it needs a way to be tilted. So a softbox kit would include a light stand, a tilter bracket, a flash mount bracket that won’t short out the TTL pins on your flash’s foot and a bracket to hold the softbox in addition to the box itself.
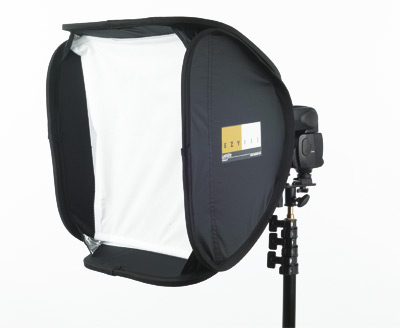 I’ve looked at dozens of softbox kits and bought more than I should on the strategy of hope. You don’t have to repeat my mistakes. What you want to buy is the Lastolite Ezybox Hot Shoe Kit. It includes a 21” x 21” softbox that folds flat, a mounting bracket, a flash bracket, a tilt adapter and a light stand, along with carry bags for the softbox and the rest of the kit. It’s your money, you can buy whatever you want, but if you buy this product, it’s going to work, you won’t be frustrated and you will get better images
There are knock-offs of this kit also available that may save you some money. I recommend the Lastolite, but you’re your own person. One critical thing to note is that you will be altering the power of the flash often, so DO NOT buy a softbox kit that puts the flash inside the box, such as any of the Westcott Apollo umbrella type softboxes. Once the flash is inside the box, your camera’s infrared control won’t work and making adjustments to the flash will make you nuts. Plus the construction is not great and the umbrella framework bends if you stare at it directly. Westcott products are generally very good. I’ve just had bad experiences with this line. They’re cheap though. Get the Lastolite.
Other Kit
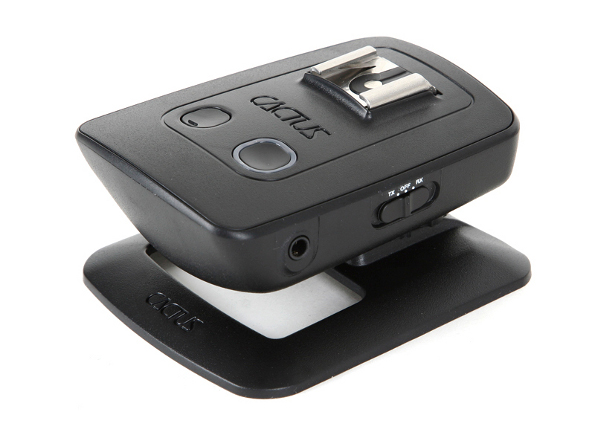 There’s a couple of other must haves and some nice to haves. The first must have is a radio trigger system. Infrared is for people who want migraines. Radio is not affected by walls, partitions, line of sight or other impediments. You can buy very expensive radio systems such as those from Pocket Wizard. Don’t. Get yourself the Cactus Wireless Transceiver Set V5. Do NOT buy the transmitter / receiver set V4. It will save you $10 but will work only if it feels like it and you will be furious. We’ve tested the V5 kit and it worked through brick walls from inside to outside. For $100 you cannot beat the system. Each unit can be transmitter or receiver. The units come with table stands and can be light stand mounted. The unit has a hot foot and a hot shoe. There is no TTL but that’s ok because you won’t be using it anyway.
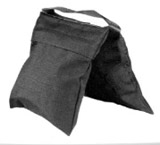 The other must have is a sandbag. Buy it empty and fill it with sand. Drape it over the leg of the light stand so if you knock the stand, or you are shooting outdoors where there’s wind, your kit doesn’t demonstrate the consistent power of gravity by falling over and smashing your flash to bits.
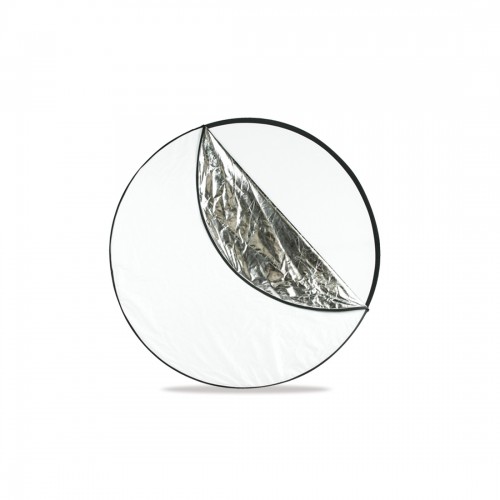 The nice to haves are modifiers. I like having a collapsible reflector around 20” in diameter, that at least can offer a silver side and white side. 5 in 1 kits are cheap and add gold and sunfire (white/gold) mix plus black to use as a flag. The other modifier I really like especially for people are gels for the flash. Flash light is more blue than orange and for some skin tones imparts an unpleasant bleached look. I recommend the Rogue Flash Gel kit since it has every gel you’ll ever need, an easy way to attach the gels to your flash head and simple wallet to keep everything in place. If budget is an issue, order yourself a sheet of 1/4 CTO and a sheet of 1/2 CTO and get some painter’s masking tape. Cut several pieces of gels that will cover the flash head and throw them with the tape in your kit.

And now on to the shooting...
Position your model, who could be your family member, friend, drop in, or even an old store mannequin where you would like to photograph the person. Move the softbox on its 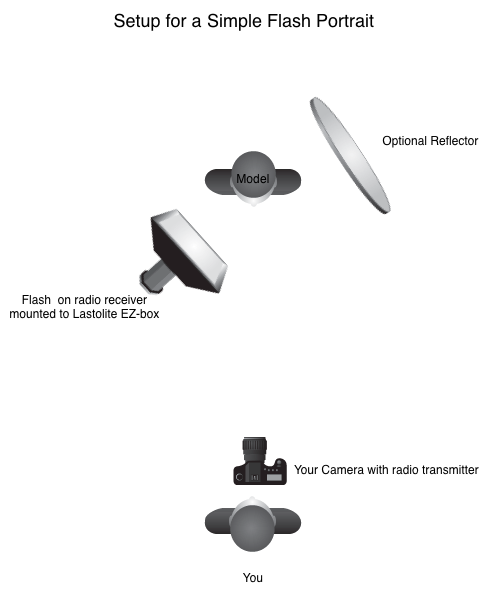 stand as close as you can to your subject without it being visible in your viewfinder. Put it at a 45 degree angle to your subject so you get some shadowing and raise the softbox and tilt it so it’s pointing down at about 30 degrees. You don’t need a protractor because these are starting points.
Turn the flash on and set it to 1/8th power in manual mode. Turn your camera on and turn on your radios. The one on your camera should be set to Tx (transmit) and the one under the flash should be set to Rx (receive). I’m assuming you’ve figured out how to put the softbox kit together and to put the flash on the receiver and mount both on the bracket. Push the test button on top of the transmitter and the flash should go off. If not, check switch positions and batteries.
Ok now that the flash is going off, go make a test shot using the settings you made earlier on your camera. Too bright? Turn the flash power down. Too dark? Turn the flash power up. Rather than adjusting aperture, shutter speed and ISO, try exhausting the power options on the flash first. I have found that for the Canon 600EX-RT flash in this softbox kit placed close to the model that for these camera settings, I need the flash somewhere between 1/16th and 1/32nd power. The reason you bought that high powered flash is that it doesn’t have to work too hard for each flash. Batteries last longer and the flash is less likely to overheat.
If you cannot turn the flash power down enough, then move on to decreasing the aperture size. Try f/6.3, then f/7.1 and on until you get the brightness level you like. The flash ideally doesn’t look like it’s blasting like a laser cannon. The initial camera settings will allow for some room or window light to be retained.
Once you get an exposure that you like, now you can work on posing your model. If you keep the distance between the model and the softbox consistent you won’t have to be playing with your settings. Try turning your model towards the light. Try away from the light. Try whatever you like, experimentation is fun and this is how we learn.
Once you’ve got your initial shots, take a break and look at the images on a larger screen. That little LCD on the back of your camera is kind of useless for any real value judgements, so get the images onto your computer or tablet. Does the light look a little too cool? Want to warm up the skin tones? Attach a 1/2 CTO gel to the front of the flash and do a couple of tests. Too warm? Switch to a 1/4 CTO. Shoot some more. I know that you can do all manner of magic in post production, but get things as right as possible in the camera and you will be happier.
Now look at the images. You should see dimension because one side of the face will be brighter than the other. Flat light is boring and makes people look like crap. You want some shadows, but if those shadows are too dark or too harsh, pull out your reflector and try some shots with the white reflector opposite the softbox to throw some light back onto the darker side. Don’t adjust your exposure, adjust the placement of the reflector. (This is where an assistant or human reflector stand is very helpful). Remember how reflectors work, they need to be pointed towards the source. Do you remember about angle of incidence and angle of reflection from high school science? If not, check the little diagram for clarity.

There you go. Of course there’s an entire process map for retouching and cleaning up images in post production but that’s not part of this article. You now have all the gear you need, at the lowest expense possible, to make great flash portraits. Now go make some shots.
Now in case you want to know how much all this will cost and where you might get it, I've prepared a little chart for you. Please be advised that since I am in Canada, I used infomation from a couple of photographic retailers here. Both have supported The Photo Video Guy site. Sadly while most products are available everywhere, the Lastolite Ezybox Kit is only available in Canada at Vistek, so if you are not near a store, you'll be ordering it online. US readers will find all this gear available from The Photo Video Guy sponsor B&H. There's a link for the Ezybox from B&H at the bottom of the article.
| Ross’ Guide to Simple Flash Lighting | ||||
| Description | Retail | Webcode | Store | |
| Flash | Metz 58-AF2 TTL Flash | 419.99 | VARIES BY CAMERA | Henry’s |
| Weight | Sandbag | 29.99 | 357BOO003 | Henry’s |
| Wireless Trigger Kit | Cactus Wireless Transceiver Set V5 | 99.99 | 029BOO060 | Henry’s |
| Gel Kit | Rogue Flash Gels | 34.99 | 131RED026 | Henry’s |
| Reflector | 5 in 1 Reflector Diffuser | 24.99 | 360WEES056 | Henry’s |
| Softbox | Lastolite EZ-Box Hot Shoe Kit (includes 21” softbox, flash bracket, tilt bracket, light stand, extension handle, stand bag, softbox bag | 279.95 | 240609 | Vistek |
Talk to you soon.
Ross
P.S. I want to thank Kevin Kertz for the awesome Strobist templates for Omni Graffle that makes diagramming setups so simple.
Want to learn more? Contact me at ross@thephotovideoguy.ca
[iframe][/iframe]


